User, Change Your Personal Settings
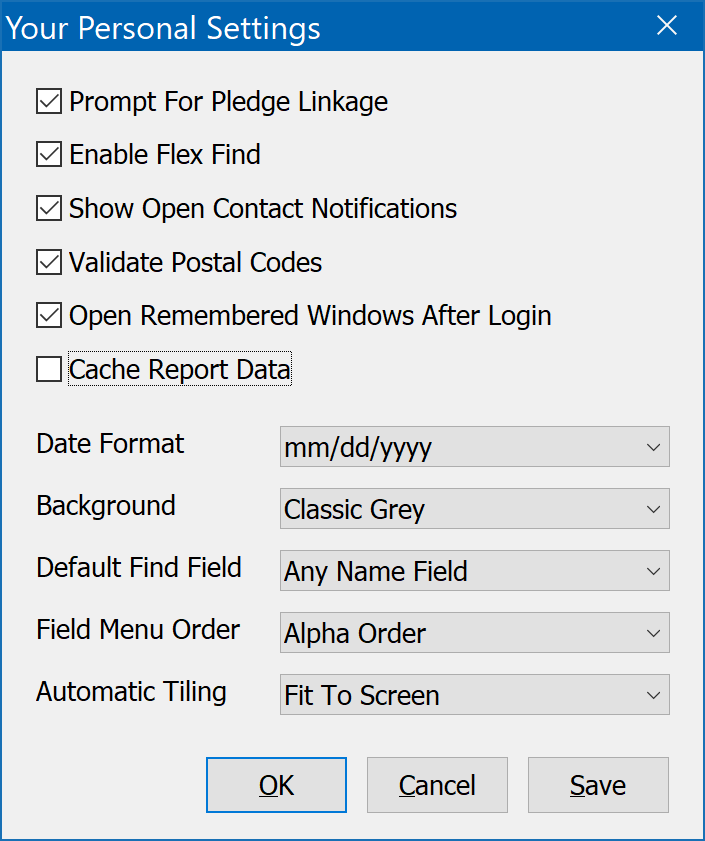
Personal Settings in DonorQuest are preference settings which affect only your user account. To access the personal settings in DonorQuest, click on User, Change Your Personal Settings. You will then see the following dialog:
Ask Before Updating Salutations On Record Save
Provided the Main Program Settings option of Filling Salutations On Record Save is turned on, each user may then decide whether or not they would like to have the Salutations of the records they edit updated automatically or not, on a case-by-case basis. If this option is turned off, DonorQuest will simply update the Salutation fields in response to Primary and Secondary name changes without asking you first. This can be convenient if you have a lot of name changes to make, and you plan to always inspect the Salutation fields on the Constituency tab of the Main Information Window after you save changes to a donor's name. In all cases, you will still have the option to directly edit the Salutation fields if they need fine tuning after DonorQuest automatically updates them.
Open Remembered Windows After Login
Turn on this setting if you would like DonorQuest to automatically open the Main Information windows immediately after you login. This is convenient if you mainly do data entry in DonorQuest and typically want to get right to the data windows.
Show Open Contact Notifications
Turn on this setting if you want DonorQuest to remind you when you have open (unresolved) contacts upon login. With this setting on, each time you log onto DonorQuest you will be shown a count of how many open contacts have coming due for the current day, and how many open contacts there are from the past which you have not yet been resolved. The same notification dialog will give you the option of immediately viewing your open contacts so that you may act on them. Having this setting on will also display a continuously updated count of the number of open contacts you have for today in the upper-right corner of the contacts icon on the DonorQuest tool bar. If other users assign open contacts for today to you as you are working in DonorQuest, you will immediately see the contact counter increase, much like seeing an unread email counter on the main icon for your email software. At anytime you may click on the down-pointing arrow to the right of the contacts icon to see your contacts.
Prompt For Pledge Linkage
During entry of a new donation, the donation may be linked as a payment towards one of the donor's outstanding pledges. When adding a new donation with the Prompt For Pledge Linkage option checked, DonorQuest will automatically look for current outstanding pledges and prompt you, asking if the donation may be a pledge payment. If you respond Yes, DonorQuest will show a list of the donor's pledges and ask which one to apply the donation towards. DonorQuest will also copy the Donation Type, Account, Stimulus, Fund, and Appeal codes from the pledge to the donation, so you can just leave those fields blank in the donation and they will be auto-populated for you (provided they were entered into the corresponding pledge fields). While not standard practice, it is possible to use different codes in the donation. To do this, fill in the donation codes before linking to the pledge. DonorQuest will then honor your code preferences in the donation - with one exception. The Donation Type and Pledge Type must both be either monetary, or of the same Alternate Unit Type.
Validate Postal Codes
Whenever you edit the name/address information for a constituent, DonorQuest will automatically check to be sure the postal (zip) code is correct for the city and state you have entered. Further, if you simply enter a zip code and press the tab key, DonorQuest will automatically fill in the city, state, and county fields for you if they are currently blank. In most cases you will always want this validation and assistance. However, since the validation is based on United States zip codes, you may wish to turn off the validation if you are using DonorQuest outside of the United States, or you are entering a large number of International addresses.
Enable Flex Find
Turn this setting on if you wish the Flex Find search box to be available to you when the Main Information window is open. Flex Find is an incredibly versatile way of searching for constituents, so you really should keep this option enabled.
Cache Report Data
DonorQuest can store and maintain a copy of data needed for the most frequently used reports on your actual workstation so that the information is readily available. In most cases this will greatly speed reporting in DonorQuest when you are running it on a local area network and you have a fast computer but a slow network connection. However in rare cases when you have a slow computer but a super fast network, you may get better performance leaving this setting off. There is no harm in turning it on and off, so feel free to experiment. Since it is a personal setting, it has no effect on other users or their workstations. Note that your network administrator must have enabled the, "Allow Local Report Cache" option under the Program Settings for this option to take effect. Also, this option has no effect if you are using the online version of DonorQuest.
Date Format
DonorQuest supports multiple date display formats. Changing this setting has absolutely no effect on how dates are actually stored in the database, it simply controls how they are shown to you in the various DonorQuest screen displays and on any report you may print.
Background
This setting simply controls the background color used for the main program window in DonorQuest. You can easily try the various color options by clicking the Save button on the Personal Settings dialog after selecting a different color from the drop-down list. This will allow the Personal Settings dialog to remain open while effecting a color change. Give it a try!
Default Find Field
When using the Find feature of the Main Information window, you are able to search by multiple fields. Normally the entry cursor is positioned in the Any Name Field blank, but if you find that more often than not you are searching by another field such as Donor ID, you can use this personal setting to tell DonorQuest to automatically place the cursor in the ID field of the Find window each time you do a Find. Note that the newer Flex-Find feature is the preferred way of interactively searching for a specific constituent.
Field Menu Order
The Field Menu is used throughout DonorQuest. It is a menu of all the predefined fields which come with DonorQuest, as well as any custom fields you define. This menu may either be shown in alphabetical order for each table, or the order in which the fields occur on the data entry forms. DonorQuest will remember your field menu order preference between sessions, and you can change it at any time.
Automatic Tiling
When routinely launching DonorQuest on different workstations, most users find it convenient to let DonorQuest automatically resize the various spreadsheet-style data windows to make optimal use of the available screen space, which can vary from workstation-to-workstation, depending on screen resolution. But you also have the option of DonorQuest always opening the windows positioned and sized exactly as you left them relative to the main DonorQuest program window. If this is your preference, then set the Automatic Tiling option to None. Otherwise, you will choose from one of the following tiling options - Main Window Priority, Maintain Window Heights, Fit To Screen, Horizontal, and Cascade. For a complete discussion of these options, please refer to the Window Menu topic.