
Extra addresses are useful for donors who have a vacation home or seasonal address. With your reports and labels set up correctly, the start and end date fields of extra addresses allow DonorQuest to automatically select the correct address based on the date of the mailing. Donors can have an unlimited number of extra addresses. You may also use extra addresses for storing additional addresses which you would like to have for reference, but which you do not plan to have DonorQuest to automatically substitute for any mailings. For example, extra addresses may also be used to store the names of multiple contact people at an organization. This can be done by simply leaving the date range for which the extra address is valid blank. Extra addresses may also be used to store archived versions of past addresses for the donor. When you click on the Archive Address button of the Main Information Form in DonorQuest, the donor's current main address will be copied to a new extra address, creating an archival copy. You may then update the donor's main address as needed, knowing that a copy of their previous address exists for reference as an extra address. The Flex Find feature of the Main Information window in DonorQuest also searches extra addresses, so the donor's record will still be found if you search on one of their past addresses.
Clicking on the Extra Address button on the DonorQuest toolbar will bring up the Extra Address datasheet window as follows:

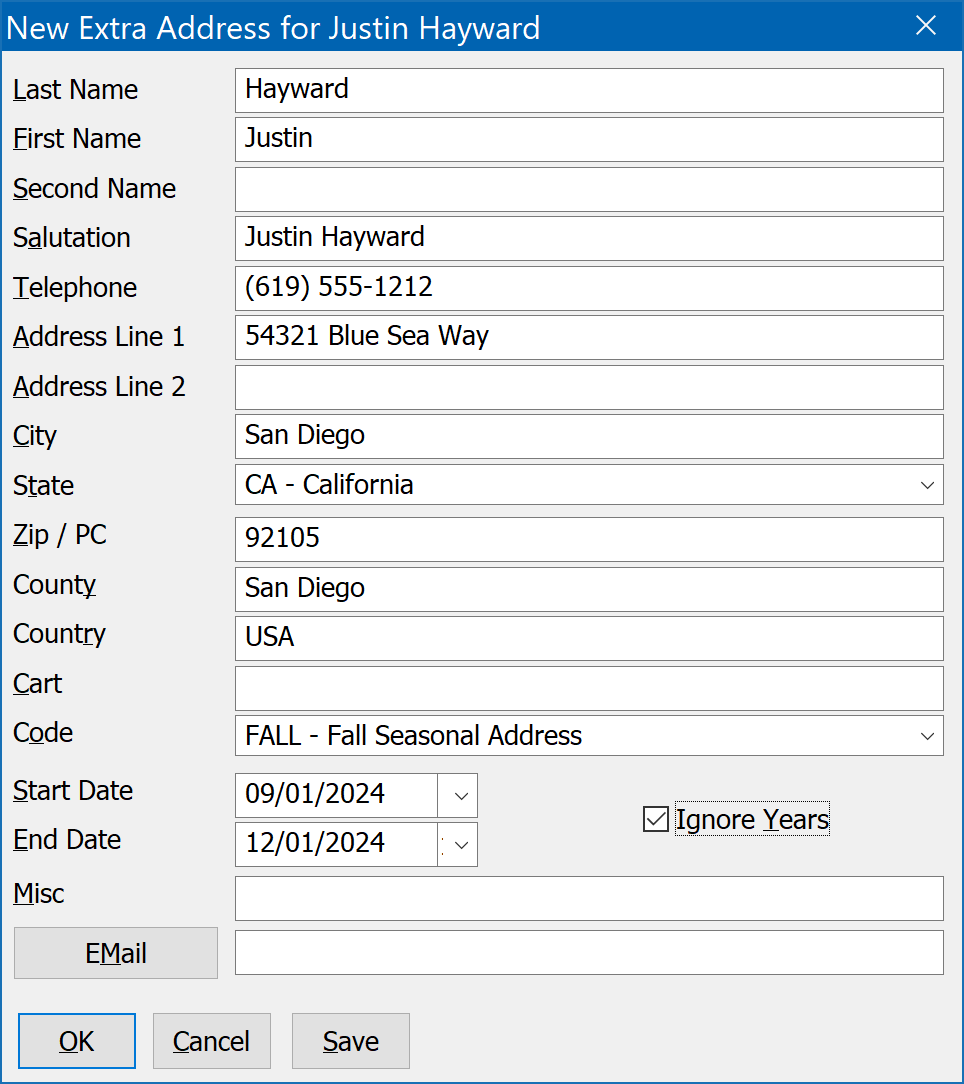
An Extra Address entry duplicates the main biographical address fields, including the first and last name fields to account for a couple with a joint donor account possibly having different addresses based on the time of the year, depending on their work assignments. When the Extra Address datasheet is active, you can create a new Extra Address for the current donor by clicking the Add button. As an example, we will add a new Summer Extra Address for the sample donor Justin Hayward.
Begin by finding sample donor Justin Hayward's record, then click the Extra Address button on the DonorQuest toolbar to open the Extra Address datasheet. Resize the newly opened Extra Address window to your taste, or use one of the Window, Tile... options. Finally, click on the Add button of the Extra Address Datasheet, then enter the following:
As with the Main name and address entry in DonorQuest, you may omit the city, state, and county fields, entering simply the zip code and pressing the Tab key. DonorQuest will automatically fill in the city, state, and county fields for you.
Once you have the Extra Address ready to save, click Ok to save the contents of the Extra Address form and close it. You will then see the Extra Address datasheet update to show the new extra address.
Here's a brief discussion of the fields which are essential for creating a valid Extra Address:
Salutation
As with Salutation 1 for the main biographical record, the Extra Address Salutation is essential because it is used on the first line of the address block. The Extra Address First and Last Name fields are for reference purposes only and are not actually used to form the address for mailing labels and such -- that's the purpose of the Extra Address Salutation. This allows for maximum flexibility in specifying exactly how a donor is to be addressed with any required title, suffix, and any possible spousal inclusion for the case of a couple. It is the begin all, end all for how the donor sees their name on correspondence, so you can make it appear exactly according to any particular preferences they have.
Address, City State, Zip
These are of course required.
Start and End Date
These date fields define the period of time for which the extra address is valid and mail may be redirected there. They can either represent a specific period in time which happens only once, or they can represent a yearly recurring window of time. If the extra address will be valid in subsequent years for the same months and days, turn on the Ignore Years checkbox. While valid dates are always required, if the Ignore Years checkbox is on, it really does not matter what years you use in the date range. Only the day and month will be considered and attached to the current year when the time window is evaluated as mailing labels are printed.
All of the Extra Address fields are covered in detail in the Extra Addresses Table topic.