While some selection results you create may be useful in the future and should be kept, most are temporary and should be deleted when you are finished with them to avoid cluttering up the Selection Results window and wasting storage space. While DonorQuest can support thousands of saved selection results, in practice there should never be a need for you to keep more than a few hundred around. For the most part, deleting a selection result is a simple matter - just highlight the result and click the Delete button in the Selection Results window. If you have a lot of selections you want to delete because you are finally getting around to cleaning up old results which no one needs anymore, it is faster to use the Mark button on the Selection Results window to first mark the selections you want to delete, then delete them all at once with the Delete button. If you have a lot of consecutive results you wish to delete, you can mark them in rapid succession by holding down the ALT key on your keyboard, and then also holding down the M key. With these two keys pressed, you should see that DonorQuest begins marking consecutive results in rapid succession. Don't worry about marking too many past where you want to stop - you can also unmark specific results which are marked by highlighting them and pressing the Mark button again. The Alt-M key combination also works for unmarking Selection Results in rapid succession.
Deleting Past Results Which Have Dependencies
The one wrinkle in quickly cleaning up past selection results you no longer need is when some of the results you are trying to delete have dependencies. That is, they were used in the creation of other results by one of the special selection result combining operations. If a selection result has other results which depend on it, those other (more recent) results have to be deleted first. Fortunately DonorQuest has an easy way of identifying the selection results which do not have any subsequent results depending on them so they may be deleted first. In fact, DonorQuest can even automatically mark all such results for you so you can browse through them and keep the markers on the ones which can go. To do this, start by opening the Selection Results window, then click on the Selections menu and choose Mark/Unmark, Mark All With No Dependencies. You will then see all of the Selection Results which have no dependencies automatically turn red to indicate then have been marked. Browse through all of your results and unmark any that you need to keep. When you have finished, click the Delete button to delete the results still marked in red. Since some of the results you delete may have depended on previous results, those previous results may now have no dependencies and could also be deleted. To detect them, run the marking process again. Repeat these steps until you have deleted the results you no longer need.
If you organization has multiple DonorQuest users, you need to take care not to delete any old selections other users have on their favorites. Here's a example of how to delete all the old selection results from 2020 which are not favored by anyone, and which are not needed in any subsequent selection results. First open the Selection Results window, and set the Filter View to, "Not Favored By Anyone" like this:

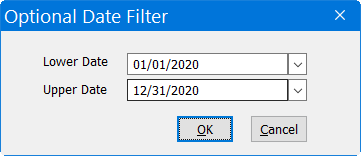
Next click on the Selections menu and choose, Mark/Unmark, Mark All With No Dependencies. Then enter a date range for the old selections to delete. In our example, we are choosing all from 2020, like this:

Click OK. Note that this will not immediately delete the results it finds, it will simply mark them. You can then review the marked results, and if you wish to proceed with the deletion just click the Delete button on the left of the Selection Results window.