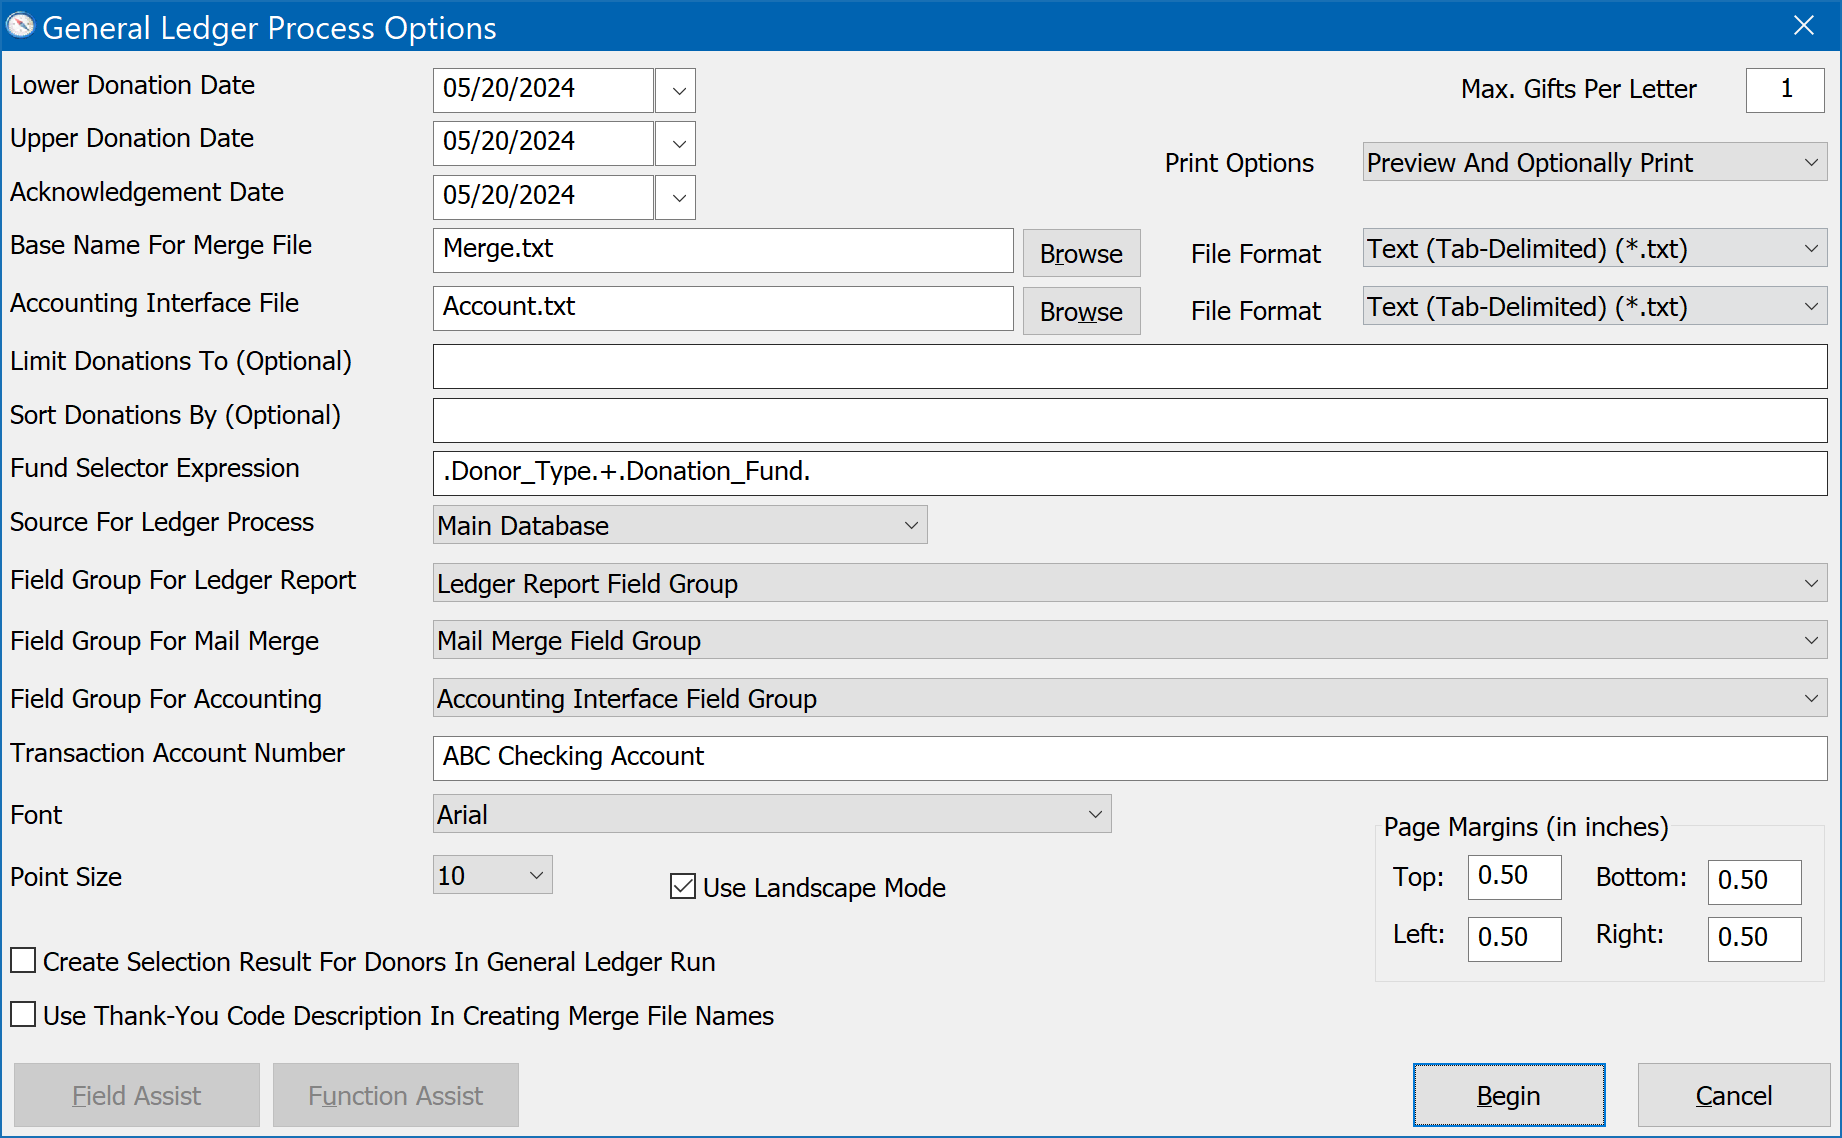
To run the General Ledger Process, click on Reports, General Ledger Process. This will open the General Ledger Process Options window, which looks like this:
Following is a description of the General Ledger options:
Lower/Upper Donation Date
The date range you specify will limit the ledger process to only those donations that fall within the specific date range.
Acknowledgement Date
The Acknowledgement Date here corresponds to the Donation When Acknowledged date each donation has, which is used to track the date an acknowledgement was sent to the donor. Entering a date here will set the Acknowledgement date for all the donations processed to the date you specify. Normally it is the current date, and that is the default entered for you here when the General Ledger Process Option dialog first opens. If you would like to run the General Ledger Process without setting the acknowledgement date for each donation processed, leave this field blank (for example, if you are re-running a General Ledger from the past just to get the printed report portion and you don't want to reset the When Acknowledged dates in the donation history).
Base Name For Merge File
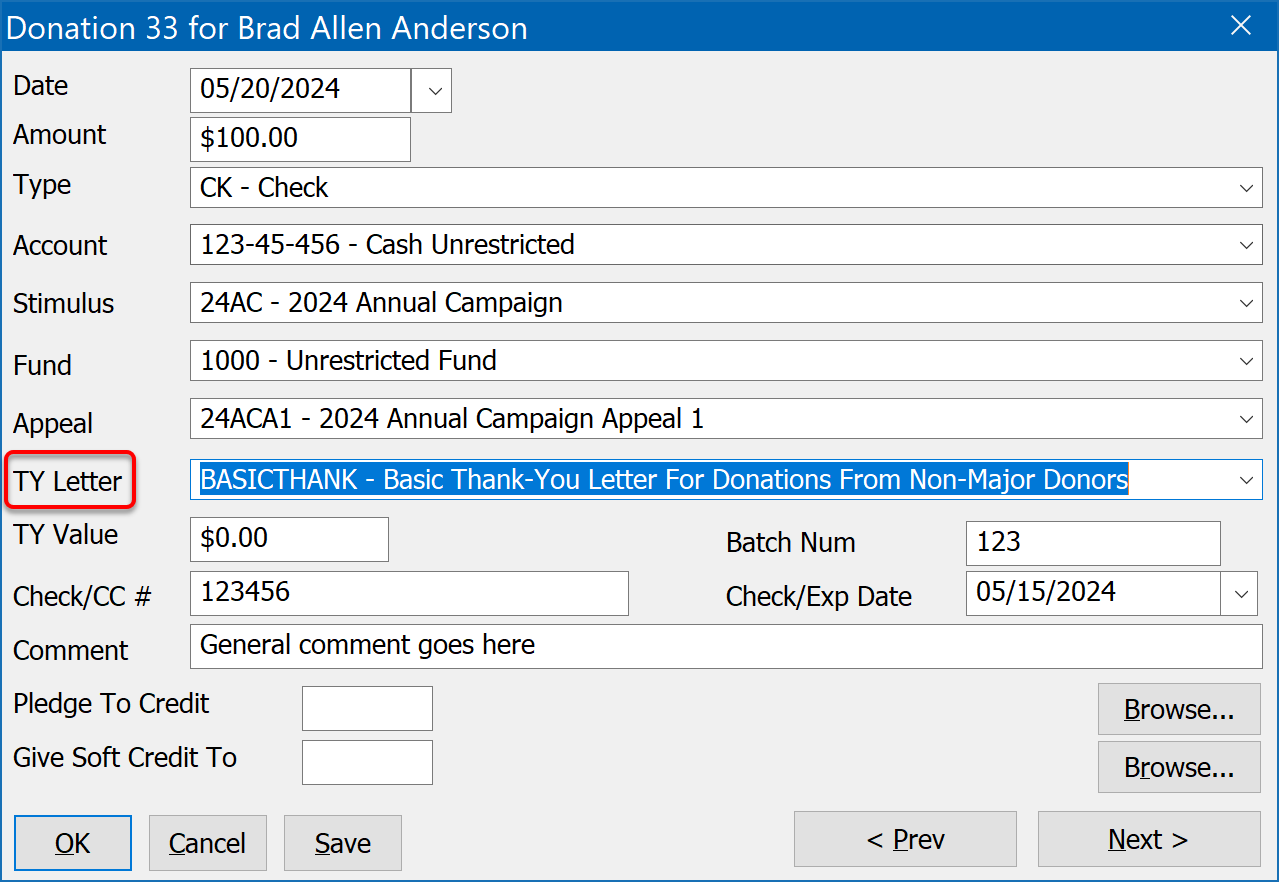
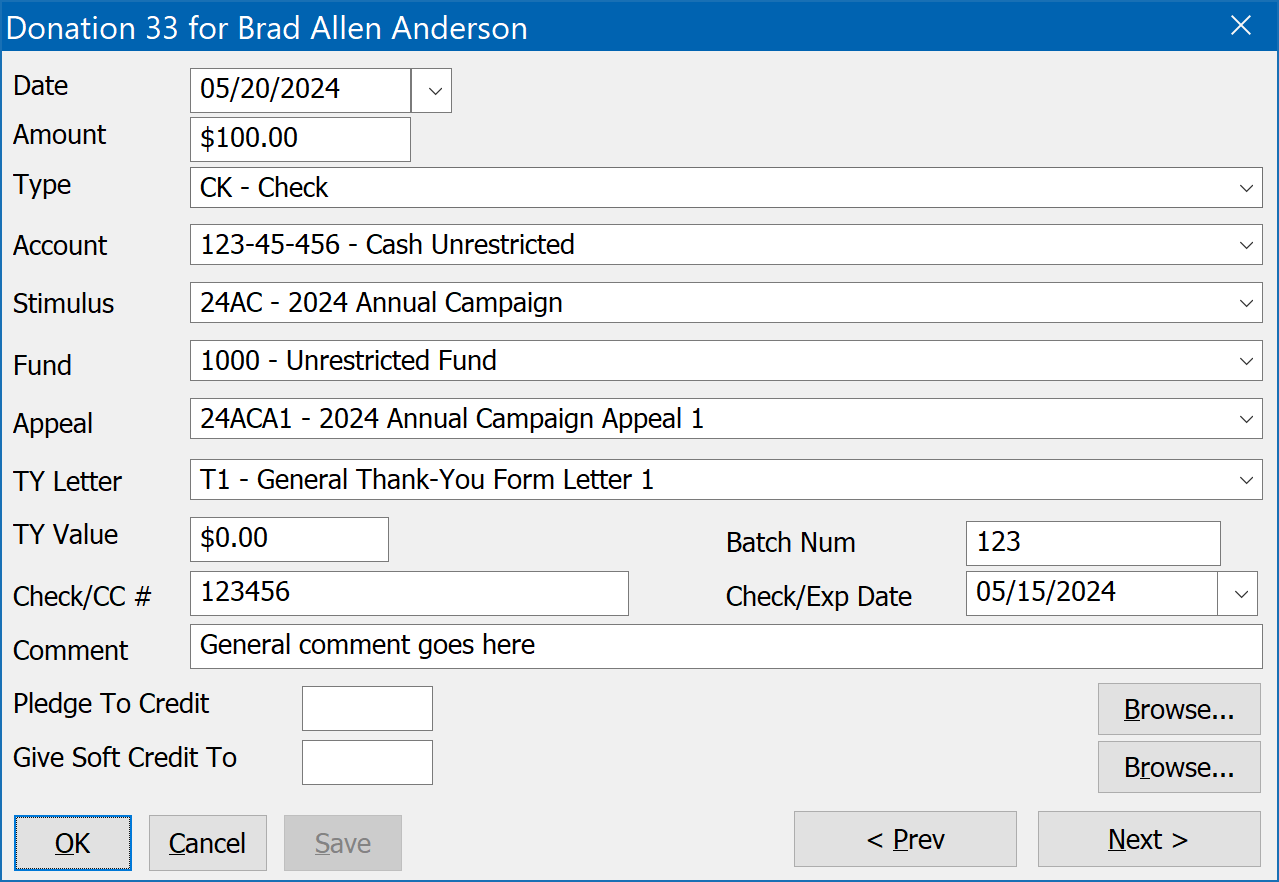
When the General Ledger process is run, it automatically creates one or more mail merge files in the \DQuest\Output\ folder. However, you can set this to any folder you wish in the Base Name For Merge File setting by typing it directly in the path, or preferably by clicking the Browse button and navigating to the desired folder. These mail merge files are for the donations assigned a date that is during the time period specified for the Lower/Upper Date (usually for the current day). The name of all merge files created will start with the base name you enter in the Base Name For Merge File setting, plus a code (or optionally the full code description) to indicate which acknowledgement letter the donations in each merge file belong to. This code or description comes from the Donation TY (Thank-You) Letter Code field of each donation (shown below with a red box around it). The normal base file name is Merge.txt (though you may set it to a different name if you wish). So, if Merge.txt is the base file name, and you have a batch of donations with BASICTHANK in the Donation TY Letter Code field, then MergeBASICTHANK.txt will be the actual name of the mail merge file which will contain these donations. The Donation TY Letter Code for each donation is specified here in the donation form when each donation is entered:
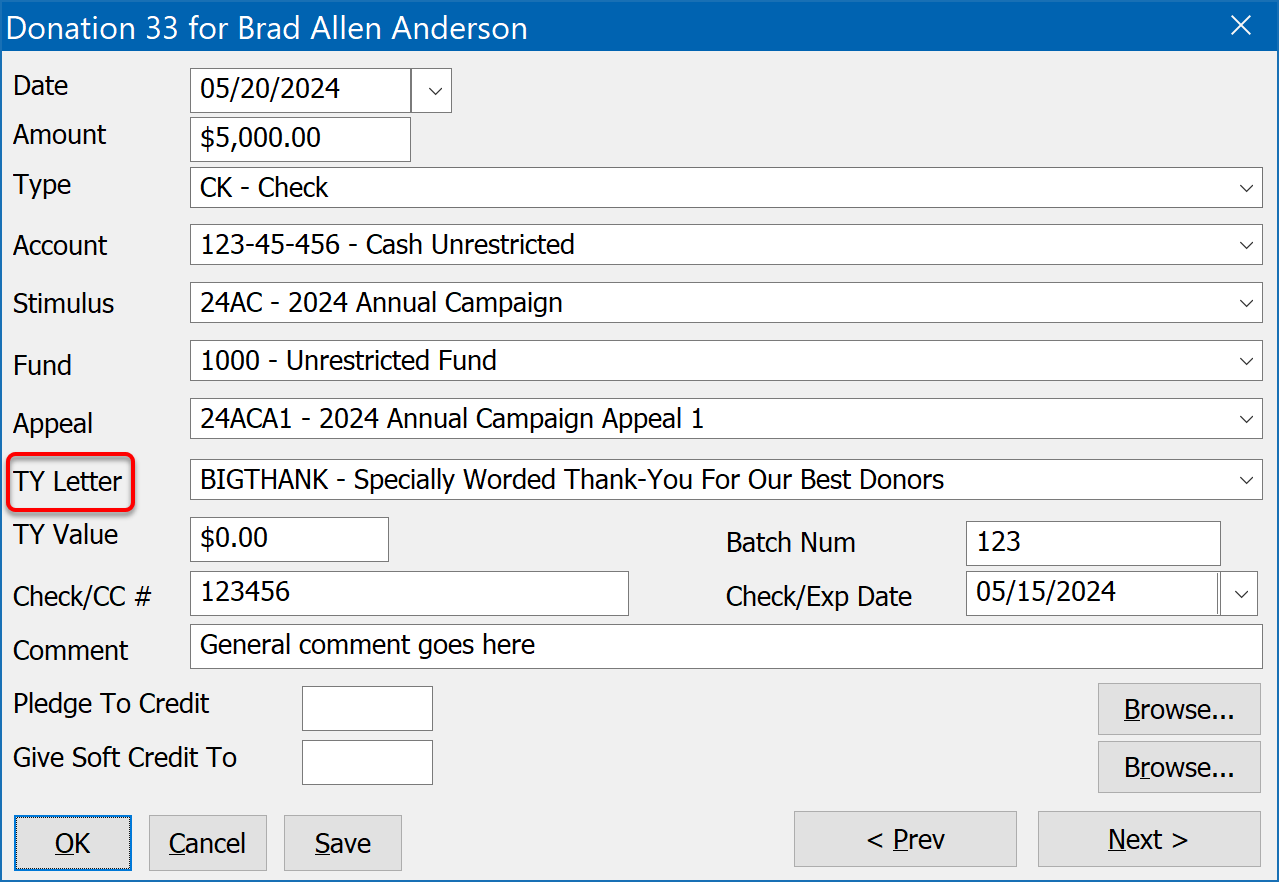
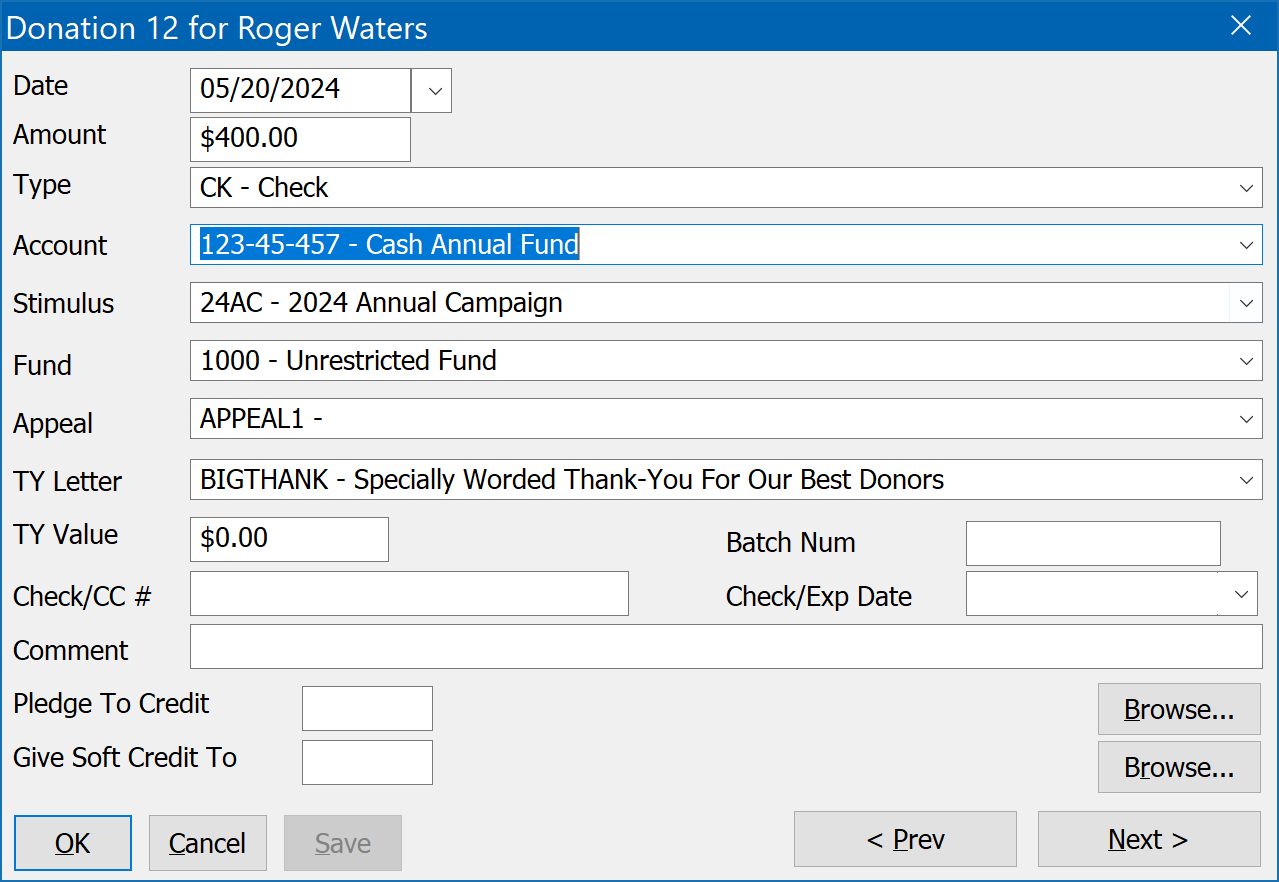
Your organization may have just one general thank-you letter you use, or you may have several letters on tap to use depending on the type of gift or donor. Using the above example, let's say your organization has a second thank-you letter you use for major donors, and you have coded it in the Donation TY Letter Code as BIGTHANK, like this:
And let's say you entered a batch of 100 donations, 20 of which were coded for the BIGTHANK letter, with the remaining 80 coded for the BASICTHANK letter. When you run the General Ledger Process for your batch, you will wind up with two merge files, ready to go:
MergeBASICTHANK.txt
MergeBIGTHANK.txt
Note that these are merge data files, containing the name/address/donation information for the donors who need to be acknowledged. These two merge files need to be paired with corresponding Word document files, which contain the actual text and layout of the two form letters. To keep things consistent, you should use the same file names for your form letter documents in Word. So, for this example, you should have two Word document files named:
MergeBASICTHANK.docx
MergeBIGTHANK.docx
Once you tell Word that MergeBIGTHANK.docx is paired with MergeBIGTHANK.txt, all you will need to do on a regular basis after you run the General Ledger process in DonorQuest is open MergeBIGTHANK.docx in Word, and Word will automatically open the companion file MergeBIGTHANK.txt to fetch the name/address/donation information for that letter, and you're ready to immediately print these letters. The same goes for the MergeBASICTHANK file pair, and any others you may have.
How you create each form letter and link it to the corresponding data file depends on the word processing software you use. Let's do an example in Word. Note that the steps you are about to see are a one-time setup you perform for each form letter you have. You only have to do these steps once for each letter. After that, Word will remember everything for each letter, including where to go to get the new donor name/address info and donations for each batch. So on a regular basis, your acknowledgement letter printing routine will simply consist of running the General Ledger Process in DonorQuest, then opening each Word doc you have donations for, clicking merge and print.
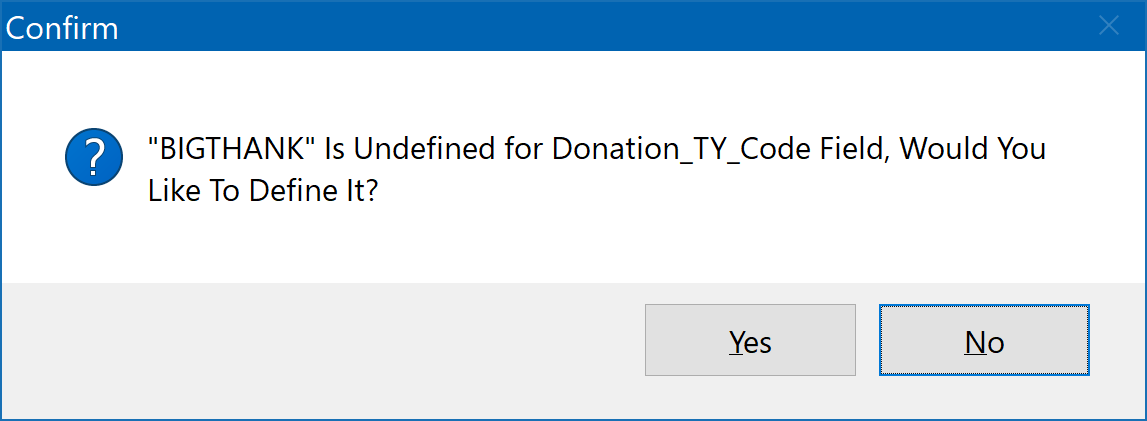
For our example, first enter a donation like the one above in DonorQuest with the BIGTHANK gift code. When you type BIGTHANK in the Thank-You Letter Code for the new gift for the first time and press the Tab key, DonorQuest will ask you if you would like to create the BIGTHANK code like this:
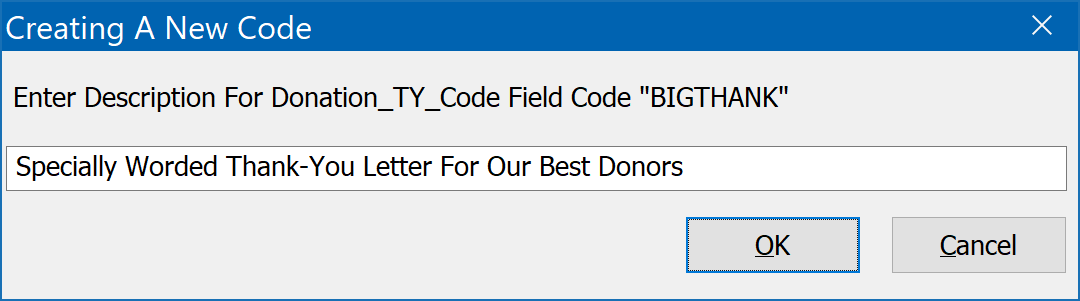
Click Yes, then enter the following description for the code and click OK:
Complete the donation entry, then run the General Ledger process in DonorQuest by clicking on Reports, General Ledger Process. Use the General Ledger Process Options shown in the example screen at the very beginning of this topic, changing only the Lower and Upper donation date range to match the date you used for the donation (usually today's date). That should result in a preview window showing the one sample donation and donor we are acknowledging. That's all you have to do in DonorQuest. The rest is done in Word.
Now start Word with a blank document, and click on the Mailings tab, followed by the Select Recipients drop-down, as shown here:

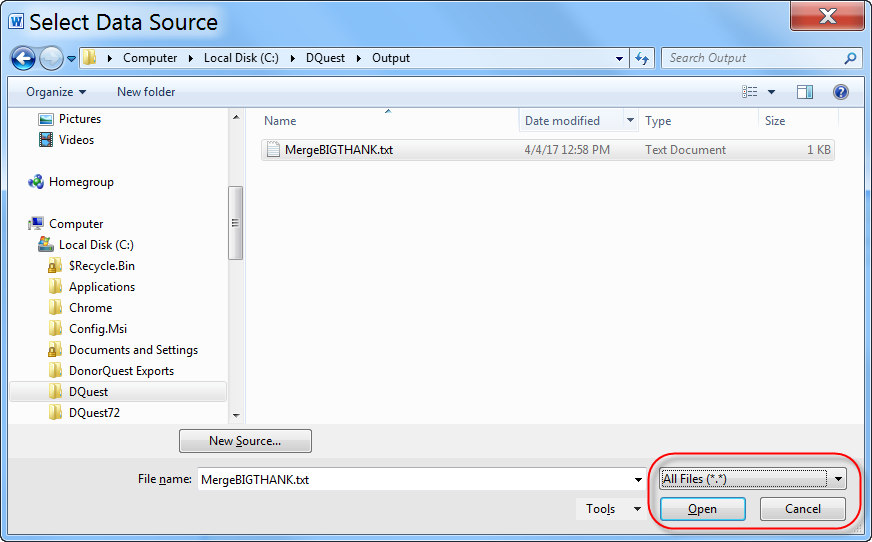
Choose the Use Existing List option. Word will then show you a file dialog. Navigate to the \DQuest\Output\ folder. This folder may be on your computer, or if you are using DonorQuest on a network, it will be on one of your network drives. Or, if you designated a specific folder in the General Ledger Process Options dialog, the file will be written there (you may wish to do this if you are running DonorQuest Online, and you wish the merge file(s) to be written to a folder on your actual computer). Once you navigate to the folder containing the merge file, click on the Files Of Type option of the Select Data Source dialog, and choose all files. The MergeBIGTHANK.txt file should appear like this:
Highlight the file and click on the Open button. This will make the connection between the Merge data file and the Word form letter you are in the process of creating. This pairing will be saved when you save the form letter, so it will be in effect each time you open the Word document containing the form letter. Now click on the Insert Merge Field button, as shown here:
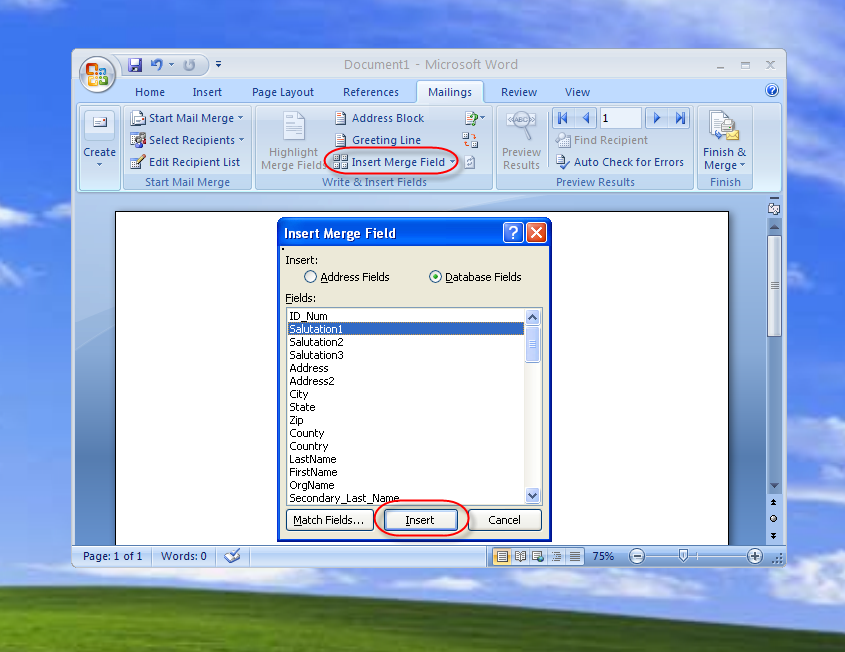
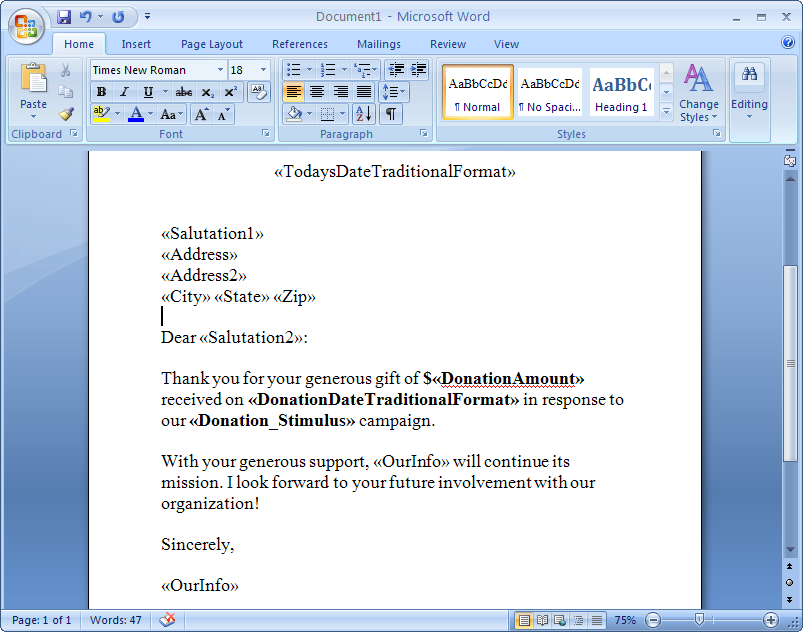
This will produce an Insert Merge Field pop-up menu with the available data fields from DonorQuest, as shown above. Construct the address block in your form letter, inserting the needed fields from this menu. Then also compose the body of your letter to have the verbiage you want. It should look something like this:
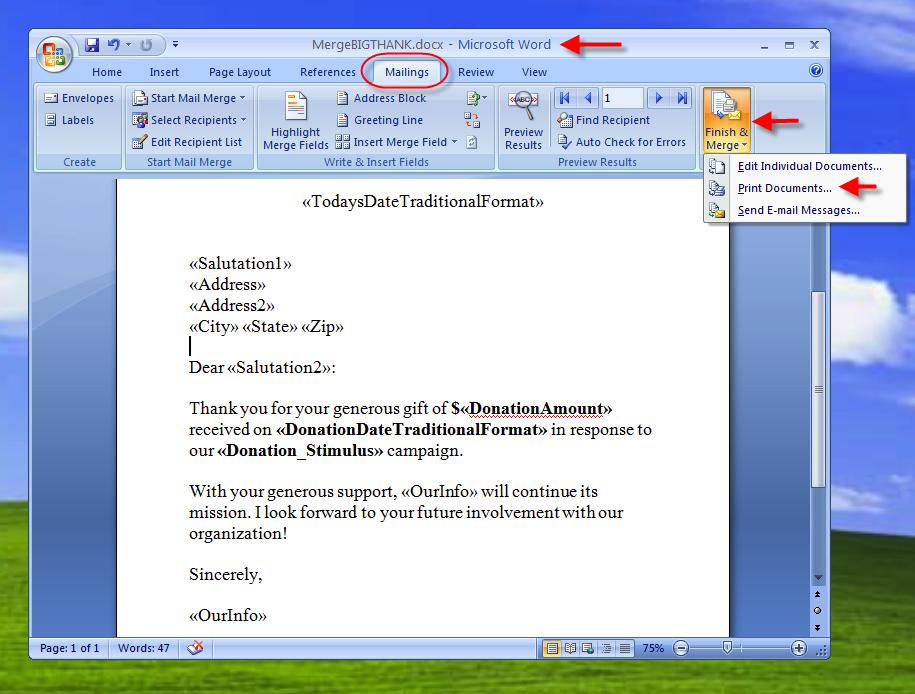
Now, most importantly, save this word document! For consistency you should use the same name as the merge file it is connected with, so in this example, save it as MergeBIGTHANK.docx. To try it out, click back on the Mailings tab, then click the Finish & Merge button, and from there choose Print Documents, like this:
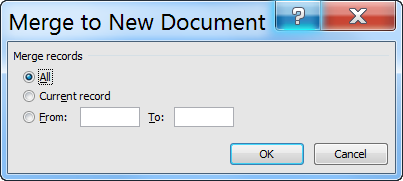
If you would like to preview the merged letters before you print them, you can alternatively click on the Edit Individual Documents option (shown above), then chose the All option:
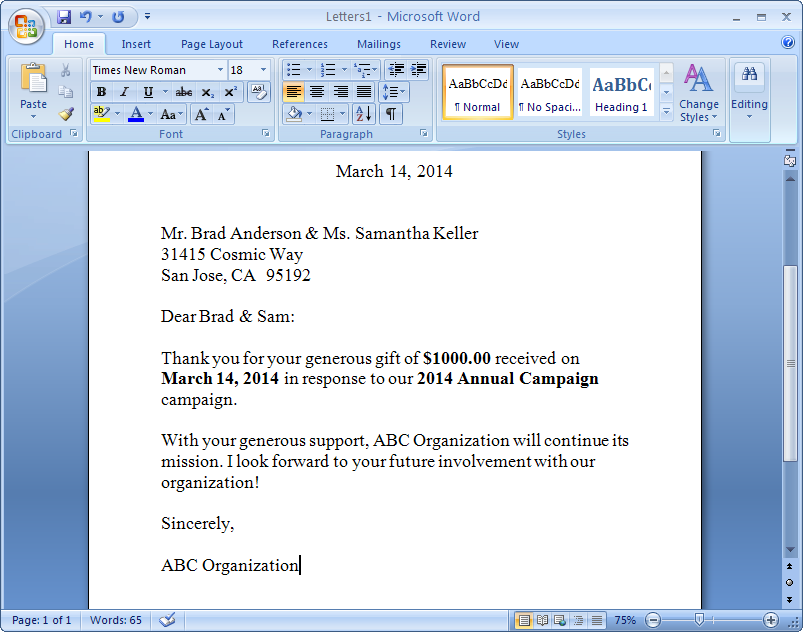
Click OK and you should see your final letters, ready for review and printing:
Merge File Format
The merge files may created in either Comma-Separated Value (CSV) format, or Tab-Delimited Text (TXT) format. Technically, the CSV format is also a text file, but commas are used to separate the data instead of a tab character, and the field data is placed within quotes. Both formats are fully compatible with Word, so mail merges may be done directly without any conversion or use of Excel as an intermediary. Some users mistakenly think the data must be in an Excel spreadsheet to do a merge. This is totally not the case - Word can work directly with the standard delimited text files produced directly by DonorQuest, so there is no need to involve Excel.
Accounting Interface File
The General Ledger Process also automatically creates an Accounting Interface File so that you may import the donation information into another database, such as an accounting application. Account.txt is the default name, and like the mail merge files it is created in the DonorQuest Output folder, unless you direct it elsewhere.
Accounting Interface File Format
You have four choices for the Accounting Interface File Format:
1.Comma-Separated Value Text: This is a standard format using commas to separate field data, and quotes to encapsulate field data.
2.Tab-Delimited Text: This is also a standard format which uses tab characters to separate field data, with no encapsulation.
3.Fix-Width Text: This is an older format, mainly used by older accounting programs.
4.QuickBooks Intuit Interchange Format: A proprietary format used by the QuickBooks accounting software (more details below).
Limit Donations To
In addition to the lower/upper donation date range limitation, you can further limit the donations included by a filter expression which must evaluate to true or false. For example, if you do not want to have donations less than $100.00 in your output file, you could use the following expression: .Donation_Amount. >= 100. Or, you could limit processing to a specific donation batch number, like this: .Donation_Batch_Number. = 100. Or, you could limit reporting to the donations added by a specific DonorQuest user, like this: .Donation_Who_Added. = "Robert".
Sort Donations By
This is an optional order which can be specified if you want the main General Ledger report to be alphabetized by something other than the default order which is Last and First names. For example, you could order the report by Donation Check Number, or by Donation Amount. When ordering by numeric fields such as Donation Amount, you need to apply a conversion function to transform the amount to a character value, like this:
Str( .Donation_Amount., 12, 2 )
Fund Selector Expression
The second part of the General Ledger Report provides totals by Account, Stimulus, Type, and Fund. The Fund Selector Expression allows you to customize the grouping factor which goes into totaling by Fund. Normally it is simply the Donation Fund field, but you could, for example, customize it such that Funds are subtotaled within Donor Types with an expression like this:
.Donor_Type. + .Donation_Fund.
Source For Ledger Process
You can run the General Ledger Process for the Main Database or the Posting File. It is recommended that you run the General Ledger Process from the Main Database unless you are using deferred posting mode for your donation entry. See the topic on Program Settings for more details.
When not running in deferred posting mode, the Posting File simply maintains copies of donation entries. It can optionally be used instead of the date range to restrict which donations are included in the General Ledger Process if you take care to purge the posting file after each General Ledger run (by selecting System / Purge / Posting File). That way, the posting file would only have donations in it which still need to be acknowledged. But in practice, remembering to purge the posting file after each General Ledger run is a bit error prone, so running the General Ledger from the main database with a date range restriction is usually the best way to go.
NOTE: If you are running DonorQuest in deferred posting mode, the posting file contains the only copy of recently entered donations, so you must run the ledger process from the posting file if you wish to report on the most recently entered donations prior to posting them. Once you have run the ledger process and confirmed the accuracy of the current donation batch, you should run the posting process (File, Run, Donation Posting), which will move the donations from the posting file to the main database, and automatically purge the posting file. Deferred posting mode is normally only used by very large organizations which need a lot of supervision and validation procedures for their donation entry.
Field Group For Ledger Report
This field group defines the columns of the first part of the General Ledger Report which show donation detail. Normally the predefined field group, "Ledger Report Field Group" is used for this, however if you would like to control the columns of the first part of the General Ledger Report, you may switch this to use a custom field group which you have created in the File, Open, Field Groups area of DonorQuest.
Field Group For Mail Merge
This field group defines the columns of the merge data file(s) produced as part of the General Ledger Process. Normally the predefined field group, "Mail Merge Field Group" is used for this, however as with any other place where field groups are used, you may switch this to use a custom field group.
Field Group For Accounting
This field group defines the data field which will be made available to your accounting software. Normally the predefined field group, "Accounting Interface Field Group" is used.
Transaction Account Number
This is the deposit account number used in your accounting software which you wish DonorQuest to post deposits towards.
Maximum Gifts Per Letter
Normally you will only want one gift record per letter. However, if you choose to do your acknowledgements less frequently, you may routinely have multiple gifts per donor to acknowledge. To avoid producing multiple thank-you letters for a single donor, you could set this number to 2 or higher. However, you will have to take care to accommodate the extra data fields in your form letter. Increasing the number to 2 will double the number of donation data fields for each donor -- you will have two donation dates, two donation amounts, etc. Specifying 3 will triple the number of fields, etc. The additional fields will be present for all donors in each record of the merge data source files, whether a given donor has that many donations to acknowledge or not. So you will need to structure your form letter accordingly, probably having a middle section which will list multiple donations in columns, accounting for the fact some of the extra donation fields may be blank for a given donor. Word will not print blank lines during a merge, so it is ok that some donors will have fewer donations than others.
Printing Options
This controls output for the printed portion of the General Ledger Process. Among the standard print and preview options, you may select no printed output at all if you simply want to run the General Ledger Process to create the mail merge and accounting interface files.
Font
This is the font for the report. All parts of the report will be printed using this font.
Point Size
This is the point size which will be used for the body of the report (all the data). DonorQuest will automatically print the column titles and page headings a few points bigger than this and in bold to help them to stand out from the data.
Use Landscape Mode
Turn this on for landscape mode printing when you need more horizontal column space. This rotates the printing to give you as much horizontal printing space as possible. It is recommended you use landscape mode if using our stock report column settings.
Page Margins
Here you can set the Top, Left, Bottom, and Right page margins. Units are in inches.
Create Selection Result For General Ledger
If the Create Selection Result For General Ledger check box is turned on, then a selection result containing the donors to receive thank-you letters will be automatically created when you run the general ledger process. This is convenient when you wish to run mailing labels or print envelopes for all the thank-you letter donors. Note that this has nothing to do with the automatic mail merge file creation -- that is always done when you run the General Ledger process. Also, many organizations use envelopes with a window, allowing the name/address information on the actual thank-you letter to show through, which eliminates the need to print separate mailing labels for the thank-you letters. So this option is rarely used.
Use Thank-You Code Description In Creating Merge File Names
When this check box is on, DonorQuest will use the thank-you letter code descriptions, rather than just the codes, for creating the mail merge data files. In the examples shown above under the Base Name For Merge File section, instead of creating the mail merge files just using the thank-you letter codes, DonorQuest would use the code descriptions, and the two mail merge files produced would be:
Merge-Basic Thank-You Letter For Donations From Non-Major Donors.txt
Merge-Specially Worded Thank-You Letter For Our Best Donors.txt
QuickBooks Interface
When you choose QuickBooks for the Accounting Interface File Format, DonorQuest will create a QuickBooks format accounting interface file. This file is ready for direct import to QuickBooks, and contains all of the transaction detail (including donor names) for the gifts included in the General Ledger run you are doing. Here's an example of how to setup your organization's checking account information in QuickBooks to make use of this feature:

In the above example, we have a deposit checking account named, "ABC Checking Account." Within that account, we have setup two sub accounts of, "123-45-456 - Cash Unrestricted" and "123-45-457 - Cash Annual Fund." These sub accounts correspond to the Donation Account field in DonorQuest, and provide a way for you to categorize each donation both within DonorQuest and QuickBooks. The number of sub accounts you may have is unlimited, both in DonorQuest and in QuickBooks. Now let's enter the following two donations in DonorQuest, assigning each to one of the two sub accounts above:
When we run the General Ledger Process in DonorQuest, we use the following settings:
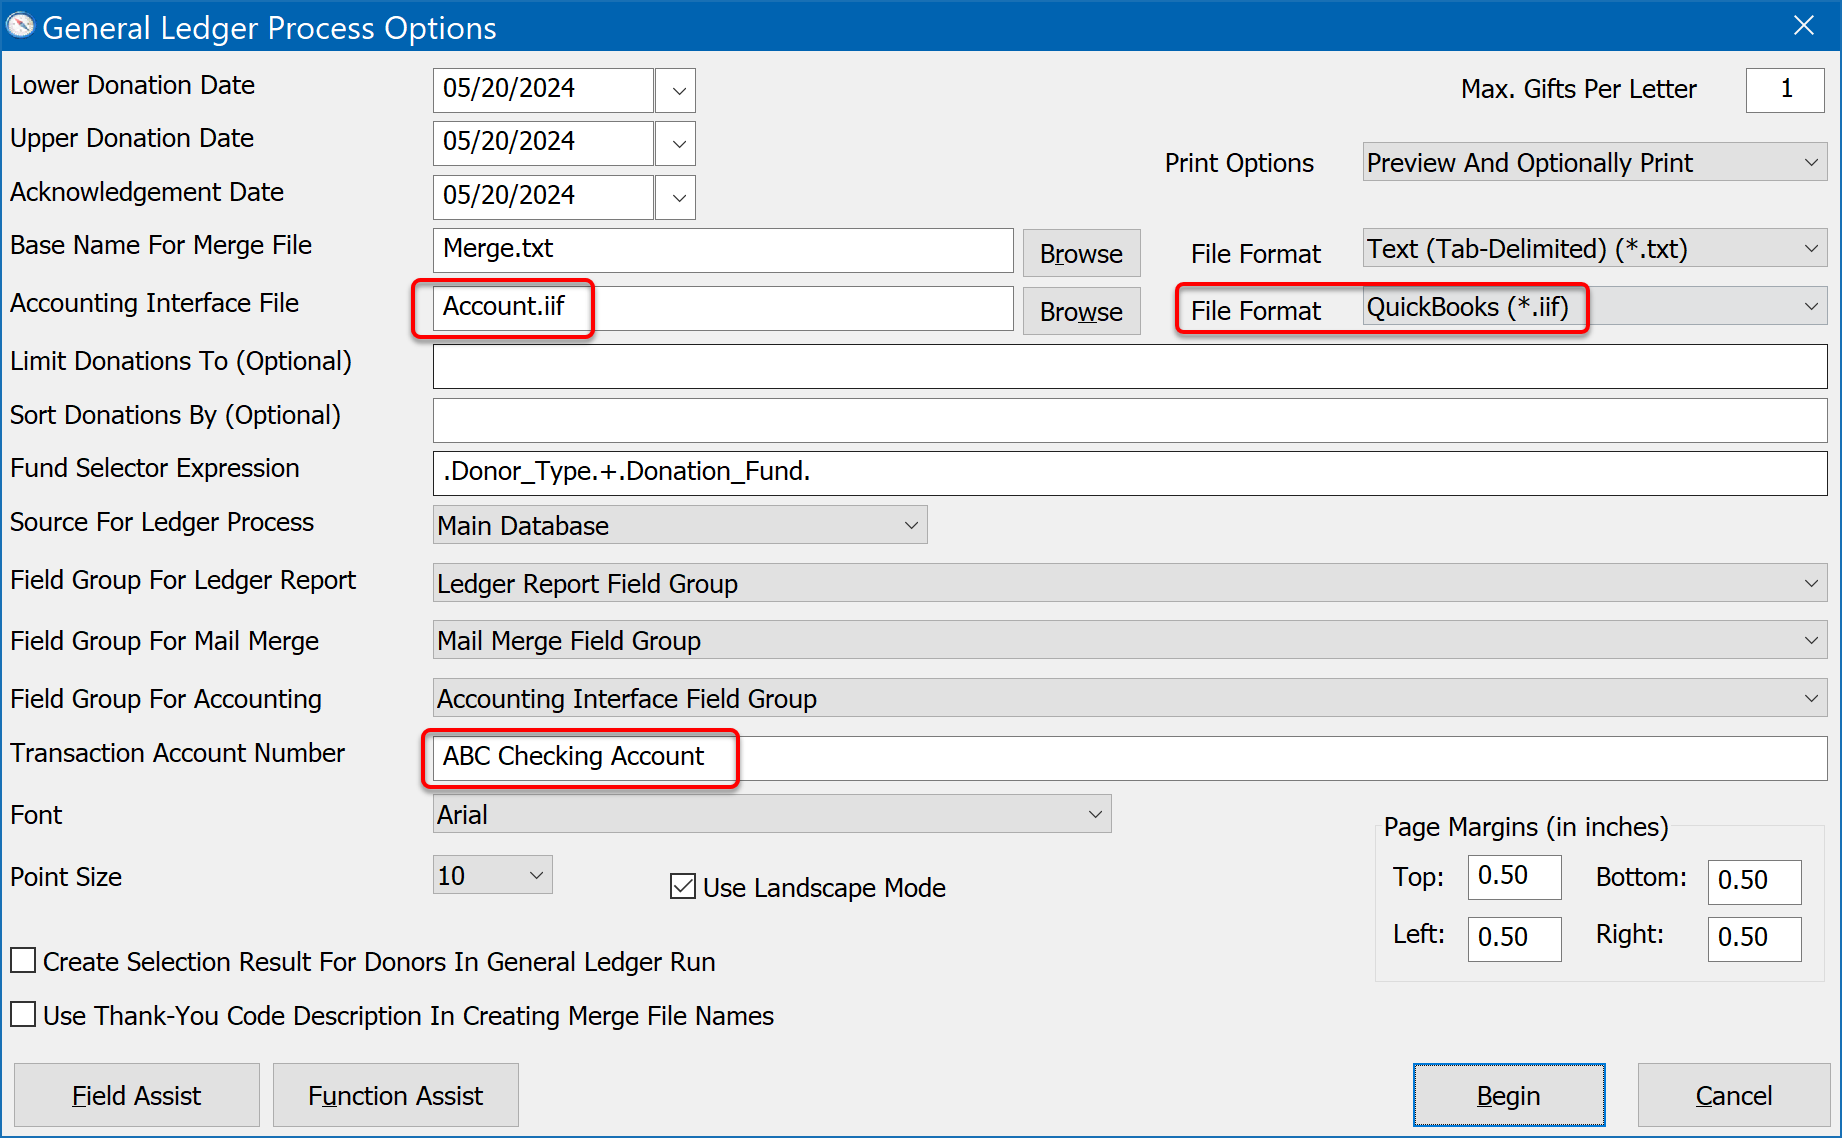
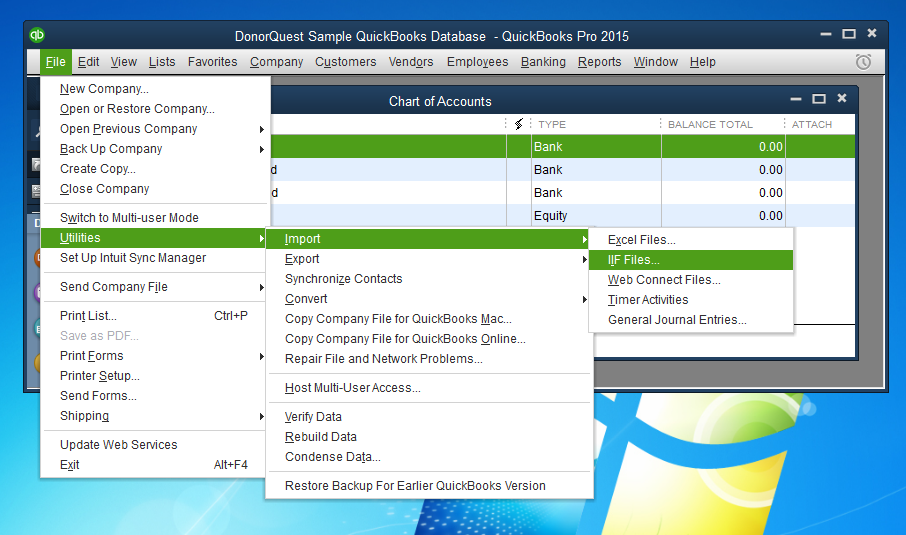
Notice the items circled in red. The Transaction Account Number (which is actually alphanumeric) is where we enter the name of the deposit account we wish the donations to go into in QuickBooks. In our example, we are using, "ABC Checking Account." When we click the Begin button, DonorQuest will create a file named Account.iif in the \DQuest\Output\ folder (or you may use the Browse button next to the Accounting Interface File to choose a different location on your computer or local area network). Once the General Ledger Process has completed in DonorQuest, the final step is to import the new transactions into QuickBooks. This is done within QuickBooks by clicking on File, Utilities, Import, IIF Files, as shown here:
QuickBooks will prompt you for the Account.iif file created by DonorQuest. Navigate to the folder where you directed DonorQuest to save the file and open it. You should then see the following confirmation from QuickBooks:
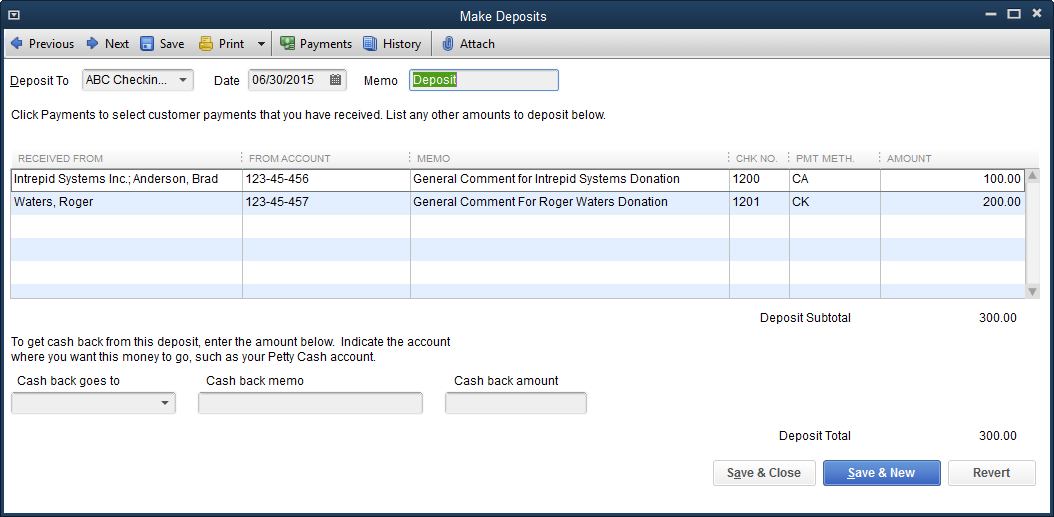
Looking at the QuickBooks Register for our ABC Checking Account, we now see a single line-item representing the total deposit amount of $300 for the two donations:
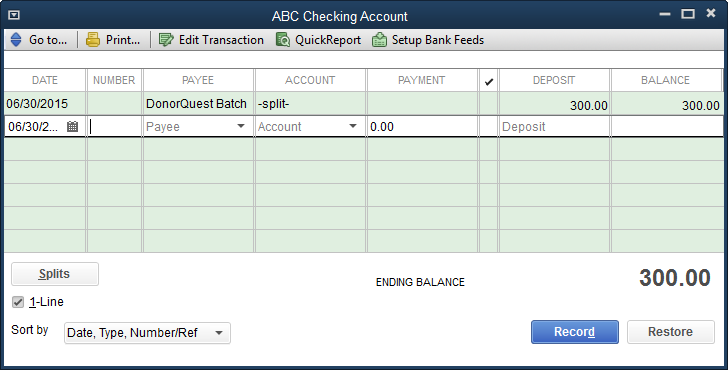
If we double-click on the -split- column for the deposit line item, we can see the individual transactions making up the batch, which include the names of the actual donors: