The Fields Tab of the Report Setup is where the body of the report is defined -- the actual data columns. Data fields and columns are usually synonymous, though columns may also be based on formulas involving one or more data fields, or values from adjacent columns. It's a bit like the functionality in a spreadsheet. Columns have several attributes such as content, title, width, and whether or not the column is to be totalled if it is a number. The opening topic on Creating and Editing Report Layouts touches on the Fields Tab briefly in the example of how to copy and customize one of the predefined reports included with DonorQuest. We will now cover the attributes of the Fields tab in more detail, using the predefined report, "Header - Donor Name And Street Address" as an example. Here is what the Fields Tab looks like for that report:
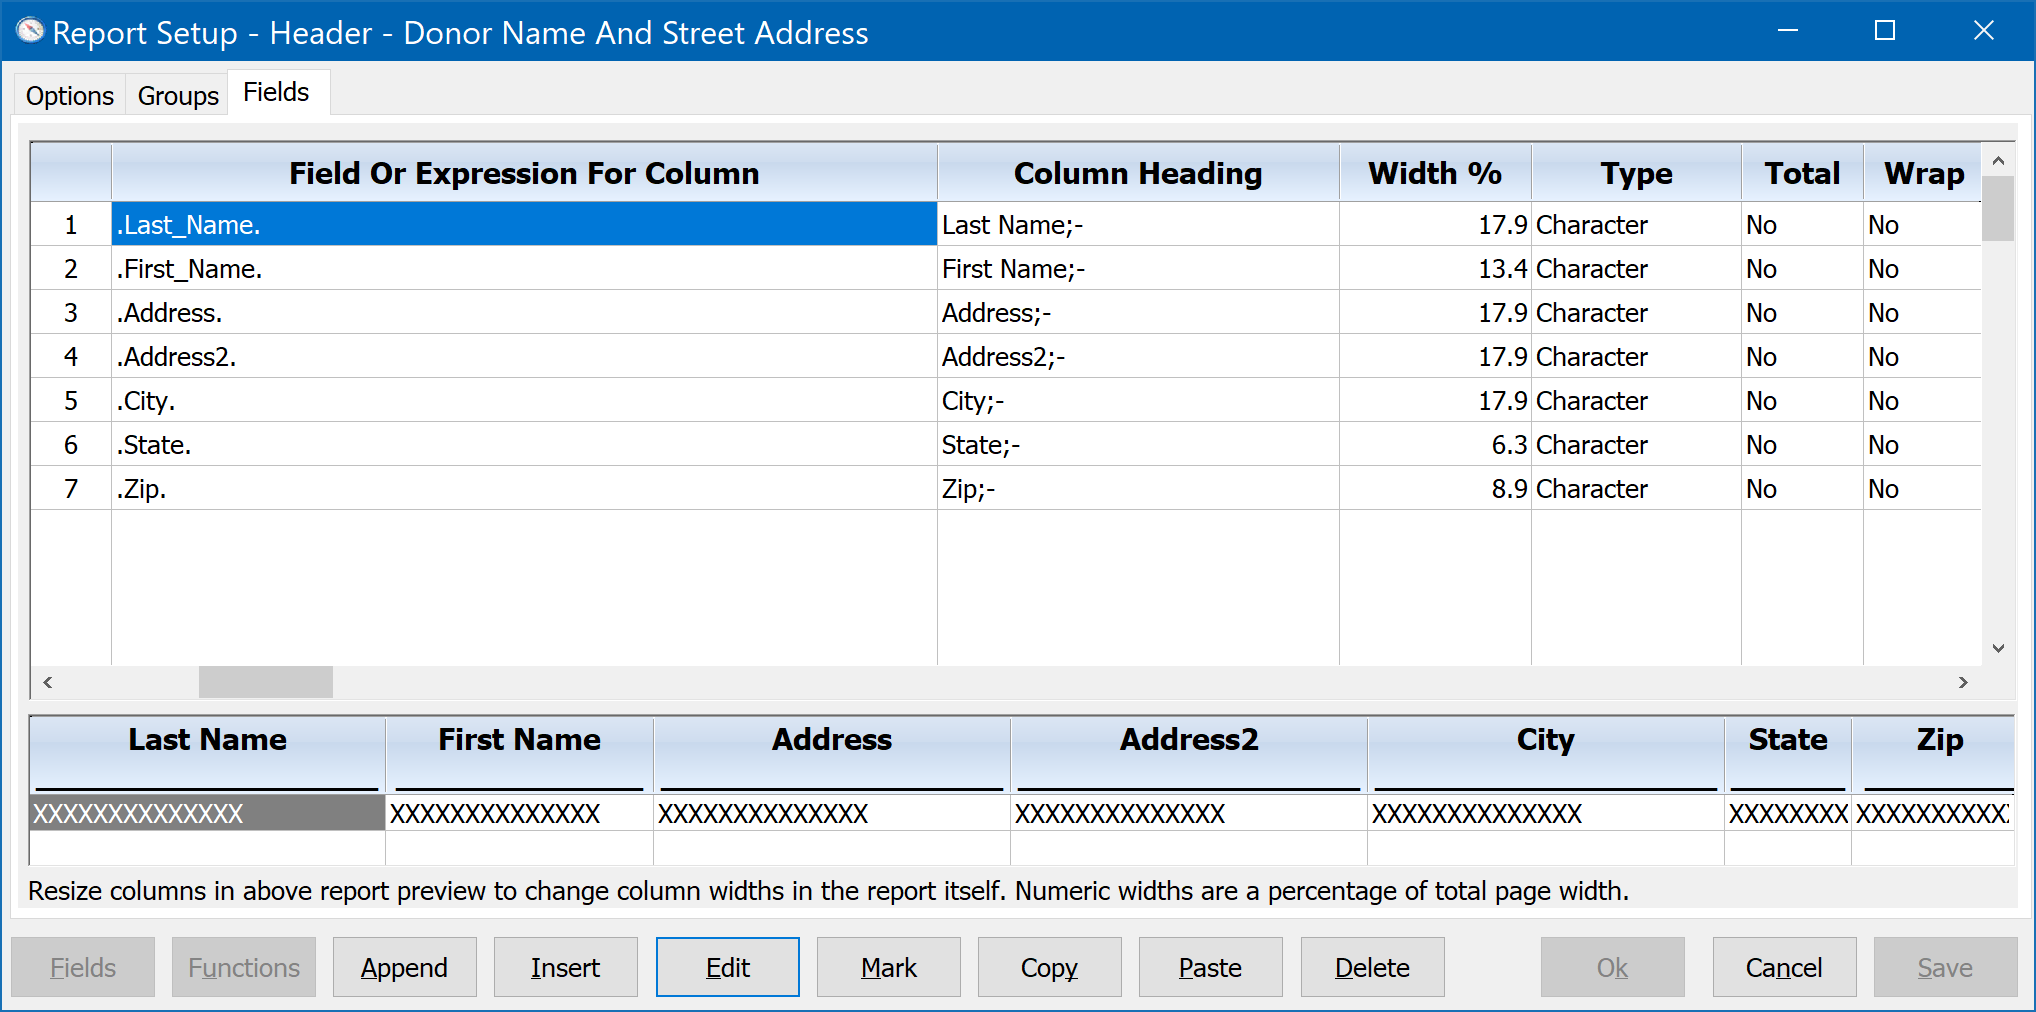
Additional attributes are shown in the upper window pane of the Report Setup window if you scroll by moving the horizontal scroll bar to the right, or just move the highlight to the right with the right-pointing arrow key on your keyboard.
Field Or Expression For Column
This attribute specifies the actual content of the column. Normally it is just a simple field name, though it could be a formula involving one or more DonorQuest fields and functions.
Column Heading
This is simply the title for each column of the report. The heading for each column may have multiple lines, and a semicolon (;) is used to separate what is to go on each line. The special notation of ;- will cause a line to be drawn across the entire width of the column, effectively underlining the column heading.
Width %
This is the width of each column. It is expressed as a percentage of the total available horizontal space on the printed page. So for example, if your report only had two columns, and you wanted them to share the page equally, they would both have a width of 50. Increasing the width percentage of a column will take away from the columns to the right, and decreasing the width percentage of a column will distribute the extra space proportionately to the columns on the right.
Type
This is the data type of the report column. DonorQuest determines this based on the field or formula in the Field Or Expression For Column. It is displayed for your information. Columns will be either Character, Date, or Numeric. Numeric columns may be totaled by turning on the Total option for the column.
Total
When totaling is enabled for a numeric column, then a total for that column will be shown on the last page of the report. For reports using grouping, subtotals will also be shown.
Wrap
When there is too much textual data to fit in the allotted width of a column (which is typically the case for the Donation Comment or the donor NotePad), turning on the Wrap attribute will use additional lines while printing as needed to print all the text in a field. Without wrapping turned on, text which would extend beyond the column width is simply not printed.
Data Formatting Template
Formatting Templates allow you to format the raw field data into more attractive forms -- for example adding commas and a dollar sign to monetary amounts. Templates consist of one or more special characters which serve as a model of how the raw data is to be formatted. For example, the "!" symbol transforms individual characters at specific positions to upper case. Following is a list of the available Template Control Characters:
9 Displays digits for any data type including sign for numeric values.
! Converts alphabetic character to upper case.
$ Displays a dollar sign to the left of a numeric value.
. Specifies a decimal point position.
, Specifies a comma position.
In practice you will normally only make use of the formatting for numeric fields. Here are a few examples:
999,999,999,999 Prints a whole number with commas, but no decimals.
999,999,999,999.99 Prints amounts with commas and two decimal places.
>$999,999,999,999.99 Prints dollar amounts with a dollar sign kept flush against the left most digit.
Column Print Condition
This is a true/false expression which must be true for the current record's data to print in the column. This is a way for a report layout to do some additional filtering which is a permanent part of the report. For example, the "Header - Donation History Report, All Donations" has separate columns for monetary and non-monetary (Alternate Unit) gifts. It accomplishes this by imposing the following print condition for the monetary donations column:
!IsAltUnit( .Donation_Type. )
The IsAltUnit() function will return true if a donation is of alternate unit type (non-monetary). The exclamation mark means "not." So the condition is simply saying that for a donation to print in that column, it can not be an alternate unit donation.
Hide Column
This is used only for very special reports in which you may need a column to exist to hold intermediate values used in a calculation at the end of the report, but you don't actually want it to print for each record of the report. An example can be found in the, "Donations - Grouped By Calendar Year" report, which uses two hidden columns to count the number of monetary and non-monetary donations, so that these counts can be shown with the totals at the end of the report. The column uses a simple counting technique of literally have a 1 for the Field Or Expression For Column, which serves to count the number of records meeting the two different Column Print Conditions. But there's no point in showing a 1 repeatedly running down the column in the body of the report, so the Hide Column attribute is turned on for the counter columns.
Print Once
DonorQuest is a relational database with there being only one record in the master Header table for each constituent, but potentially multiple records in the Donation, Pledge, Contact, etc. tables for each constituent. In database terminology, the Header table is the Parent table, and all the other related tables are Child tables. When creating a Header (constituent) based report layout which also includes fields from child tables such as Donation, Pledge, Contact, etc., normally all Donations, Pledges, etc. are shown for each master (Header) table record. If you wish only the first related record of a given child table to be shown, enable the Print Once option.
VTrim Column
VTrim stands for Vertical Trimming. It will eliminate blank lines in a column. This is only needed for columns which are printing long character fields -- such as the DonorQuest NotePad. With vertical trimming on, blank lines which may have been entered in the DonorQuest NotePad for a donor will not waste space in the report. This feature is also handy if you are constructing a character expression involving multiple character fields you would like to stack vertically, and you want to account for some of the fields possibly being empty. An example of this is found in the, "Header - Complete Information On Each Donor" report, which is the most complex of all the pre-defined reports included with DonorQuest. It uses just about every feature of the DonorQuest report writer!
Eval Before Column
This is a rarely used reporting feature, intended mainly to support the use of report variables which need to be updated during the running of a report. The expression in this column attribute is evaluated before the column data expression.
Eval After Column
This is also a rarely used reporting feature, intended mainly to support the use of report variables which need to be updated during the running of a report. The expression in this column attribute is evaluated after the column data expression.
The Report Setup Append, Insert, And Edit Buttons
The Append button is used to add a new column to the report to the right of all columns currently defined. The Insert button will add a new column at the current edit position given by the blue highlight. When a new column is added by either button, the Field Select menu will appear, allowing you to choose the field you wish to have in the column. Typically a single field is all you would have in a given column, though field expressions involving multiple fields in a single column are also supported.
When you need access to the various attributes controlling how an existing column is printed, you may click the Edit button (or just double-click on any attribute of the report column in the upper window). The Report Column Editing dialog will then open, allowing you to configure the column. For example, with the Last Name column highlighted as shown above, clicking the Edit button would display:
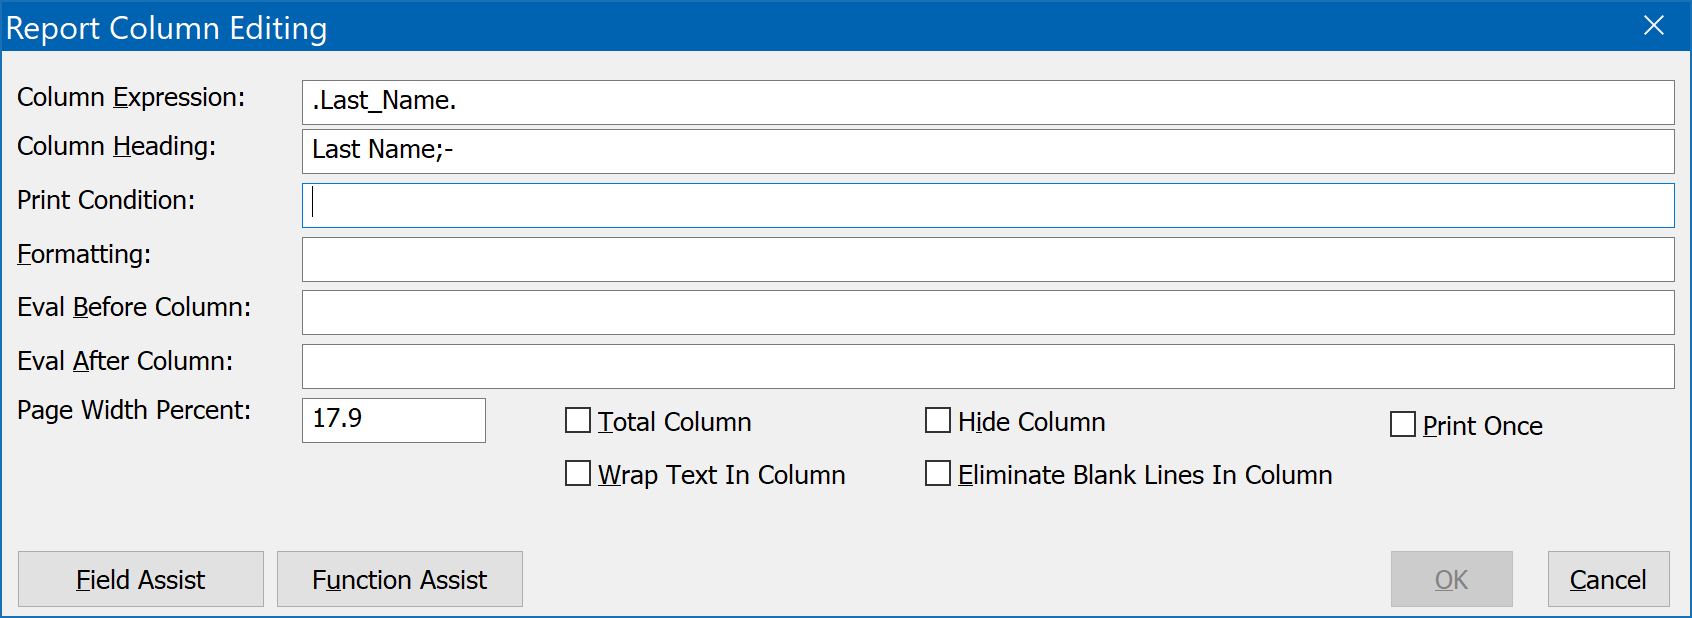
The Field Assist and Function Assist buttons of the Report Column Editing dialog will open a menu of available DonorQuest fields and functions to use with the column attributes which support expressions, such as the Column Expression and the Print Condition.
The Report Setup Copy And Paste Buttons
These buttons allow you to copy and paste an entire column definition within the current report layout, or between report layouts. You may also copy and paste a block of column definitions by first using the Mark button to mark multiple column definitions. The columns you copy remain in the paste buffer between report editing sessions, allowing you to copy columns from one report layout to another.
The Report Setup Mark Button
This button allows you to mark multiple column definitions for copying or deletion.
The Report Setup Delete Button
This button will delete any marked column definitions. If no column definition is marked, the currently highlighted column definition will be deleted.