Configure, Setup Auto-Exports...
Sometimes you may need to have data exported from DonorQuest routinely and automatically. Automated Export Actions in DonorQuest allow you to specify the information to be exported, and how often to do it - daily, weekly, or monthly. You can create multiple automated export actions, each with their own schedule and content. To setup an automated export, click on Configure, Setup Auto-Exports. You should see the Auto-Export Setup dialog, which looks like this:
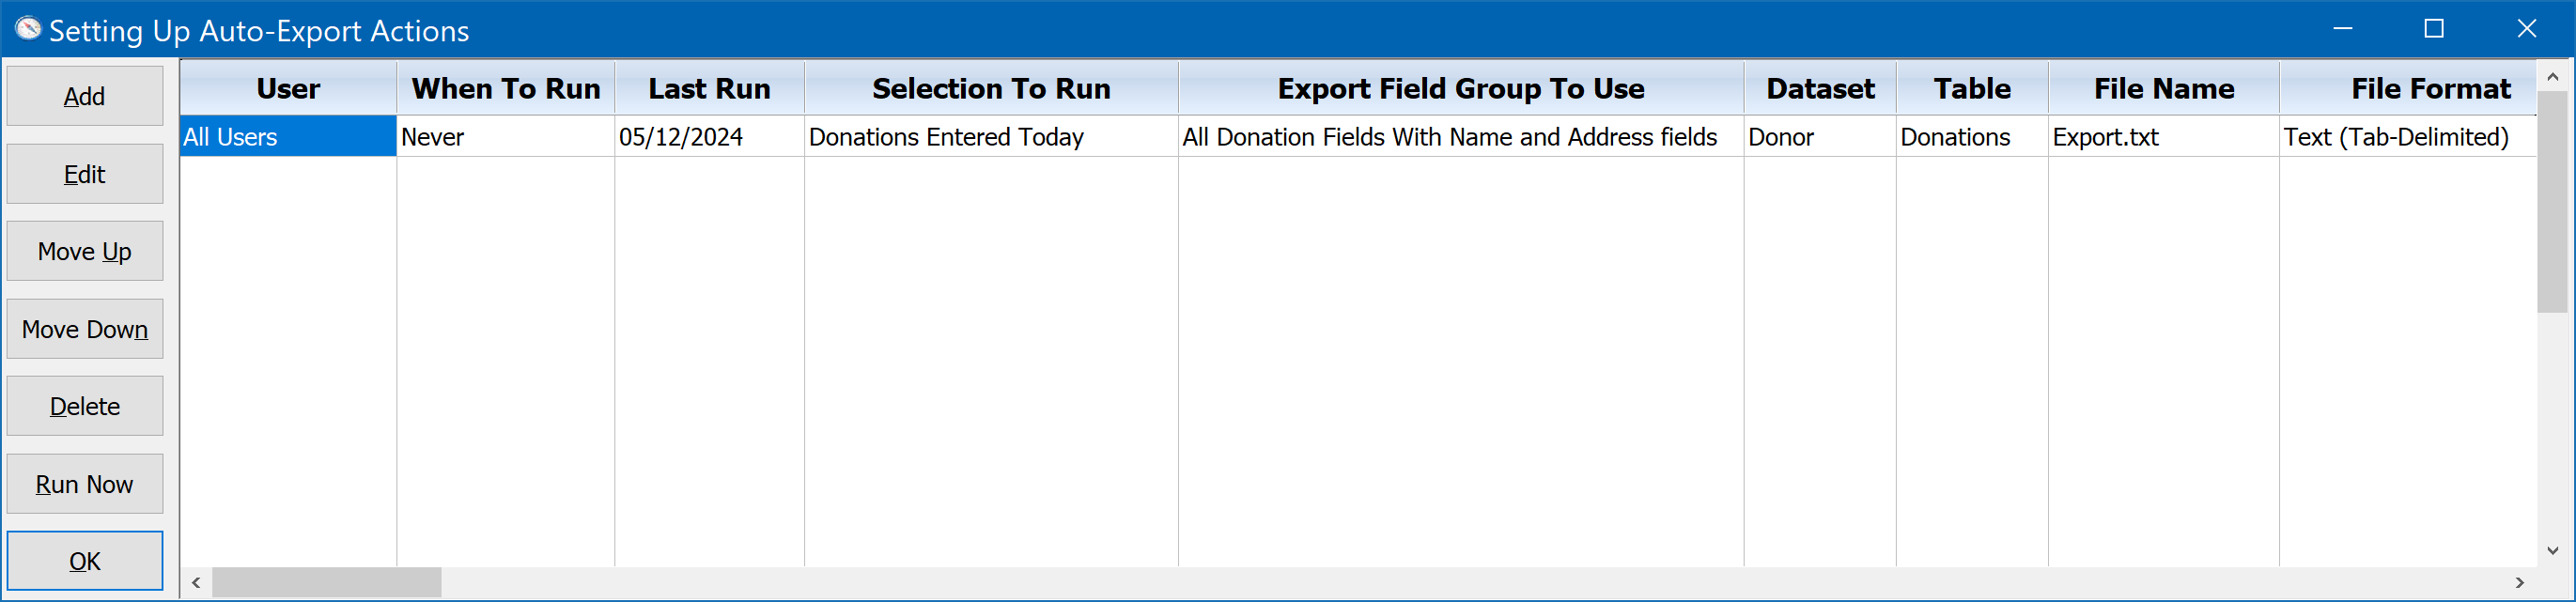
The above example shows an automated export of donation information which will be run on a daily basis. Specifically, the donations for the current day will be selected and exported using the field group, "All Donation Fields With Name And Address Fields." The data will be written to the file Export.txt inside the \DQuest\Output\ folder. Since this will be run everyday and the file may already exist from a previous run, DonorQuest will automatically append the date to the file name. In the above example, if today were April 27th, 2024, the actual file created would be \DQuest\Output\Export-20240427.txt.
Adding An Automated Export Action
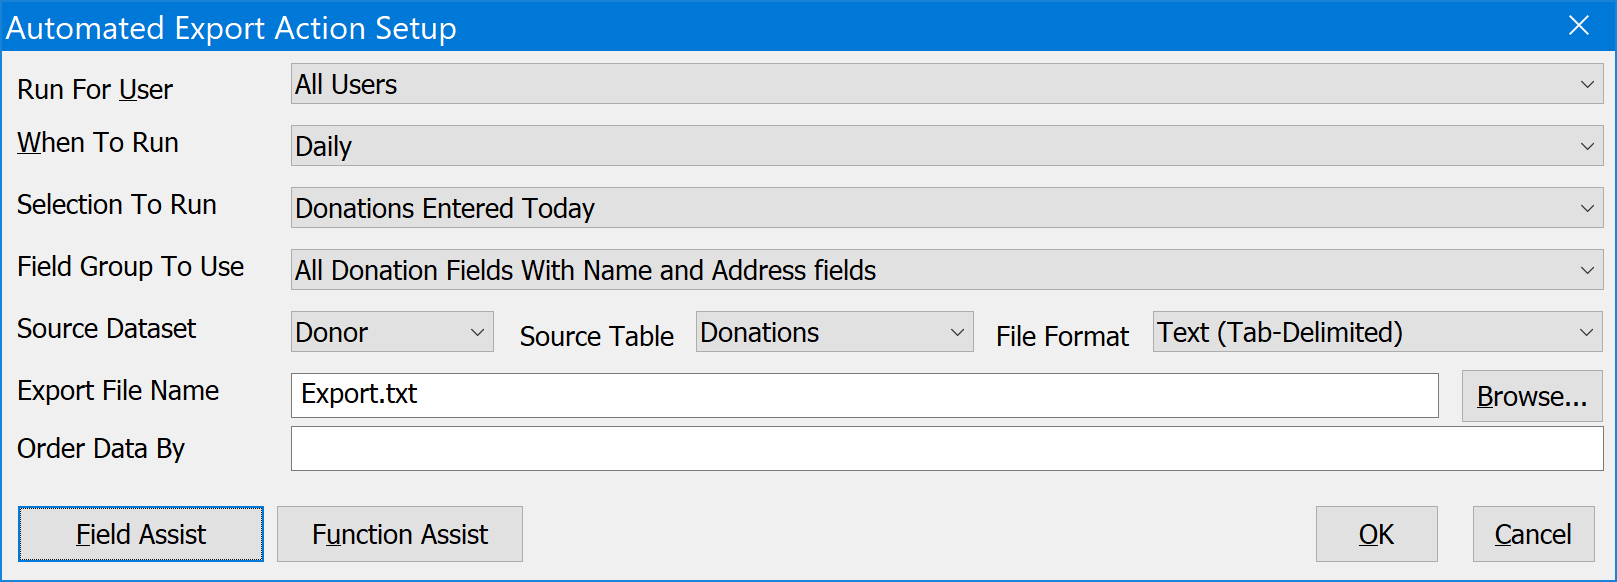
To create a new Export Action, click the Add button. You will then see the Automated Export Action Setup dialog, which looks like this:
Run For User
In the above example, the automated daily export is done for all users. However, when a specific user wishes the export to be written to a folder which only they have access to (such as the documents folder on their computer's local drive), then the automated export can be made user-specific by choosing a user's name from the drop-down list under Run For User. That way, DonorQuest will only perform a particular export if the specific user it is intended for is logged into DonorQuest.
When To Run
This is how often the export action will be run. It can be run on a Daily, Weekly, or Monthly basis. It may also be set to Never to temporarily deactivate it, but keep it around for later use.
Selection To Run
This may be one of the many predefined selections in DonorQuest, or a custom one which you have created. It will control which records will be selected for export. In the above example, only donations for the current day are selected from among all the donations which exist. The Selection Definition, "Donations Entered Today" is provided as one of the predefined selections in DonorQuest. You can see how it is defined by clicking on File, Open Selection Definitions. You will see it on the menu. Clicking Setup will allow you to see how it is defined. You may use it or any other selection definition as a template for a new custom selection definition.
Field Group To Use
Where the Selection To Run determines which records are exported, the Field Group To Use specifies the particular data columns which will be included in the output file. In the above example, the "All Donation Fields With Name And Address Fields" field group is used. As its name implies, it will export all donation fields, along with name and address information for each donation.
Source Dataset
The Source Dataset specifies which of the three DonorQuest datasets will be accessed during the selection. All active donors and prospects are maintained in the donor dataset, so that is normally what you will use for the Source Dataset. However, it is also possible to base the selection on the archive or buffer datasets. The archive dataset is where inactive donor and prospect accounts are stored, and the buffer dataset is simply a temporary holding area where you may have placed copies of existing donor and prospect accounts. While there is an inactive status option for donors who are still in the Donor dataset (mainly intended to keep them from being included in solicitations), moving them to archive completely isolates their accounts and takes their donation history out of all financial reports run from the main Donor dataset.
Source Table
Each dataset has seven tables, each storing a different aspect of a donor's account data. The header table stores the main biographical information for all donors and prospects (name, address, list codes, etc.), and it is normally what you will use for the source of a selection. However, if you wish to select specific donations, pledges, memos, etc., then you may change the source table accordingly. The above example selects from the Donations table, since we wish to target specific donation records for export.
File Format
The export file may be in either Text (Tab-Delimited) or CSV (Comma-Delimited) format. Technically, the CSV format is also a text file, but commas are used to separate the data instead of a tab character, and the field data is placed within quotes. Both formats are universal and fully compatible with other software programs, including Excel. For example, they may be used directly with Word, so mail merges may be done without any conversion. They may also be opened directly by Excel.
Export File Name
In the above example, a simple file name was used which results in the export being written to the default \DQuest\Output\ folder. However, you may also specify that the file be created in a specific folder. This is done by clicking the Browse button to the right of the Export File Name blank, and navigating to the folder you wish the file to be written to. The path will then be added before the file name. If the path refers to a folder which is only available when a specific user is logged in (such as the documents folder on a specific user's computer), then the export action should be assigned to the specific user it is intended for by choosing the user's name from the drop-down list under the Run For User option.
Order Data By
This is an optional order to place the data records in before they are written to the export file. For example, if your automated export action is exporting donation records, and you would like them to be in ordered based on the Donation Stimulus field, then you may specify this field. To do this, position the cursor in the Order Data By field, click the Field Assist button, and choose the Donation_Stimulus field.