User, Setup User Accounts
If you are the system administrator for DonorQuest and this is your first time accessing the program, you may use the Guest account to gain full access. You should immediately add a user account for yourself with full access enabled, then delete the guest account, or at least disable most of the rights for it (in particular the highest right which gives the ability to add and delete user accounts). If anyone else in your organization should have administrator rights to DonorQuest, you should also setup a new account for them at this time. Occasionally when users contact us for support, we will need them to have administrative rights to DonorQuest. So if your availability is limited, it is good to have a second person in your organization who also has administrator access to DonorQuest.
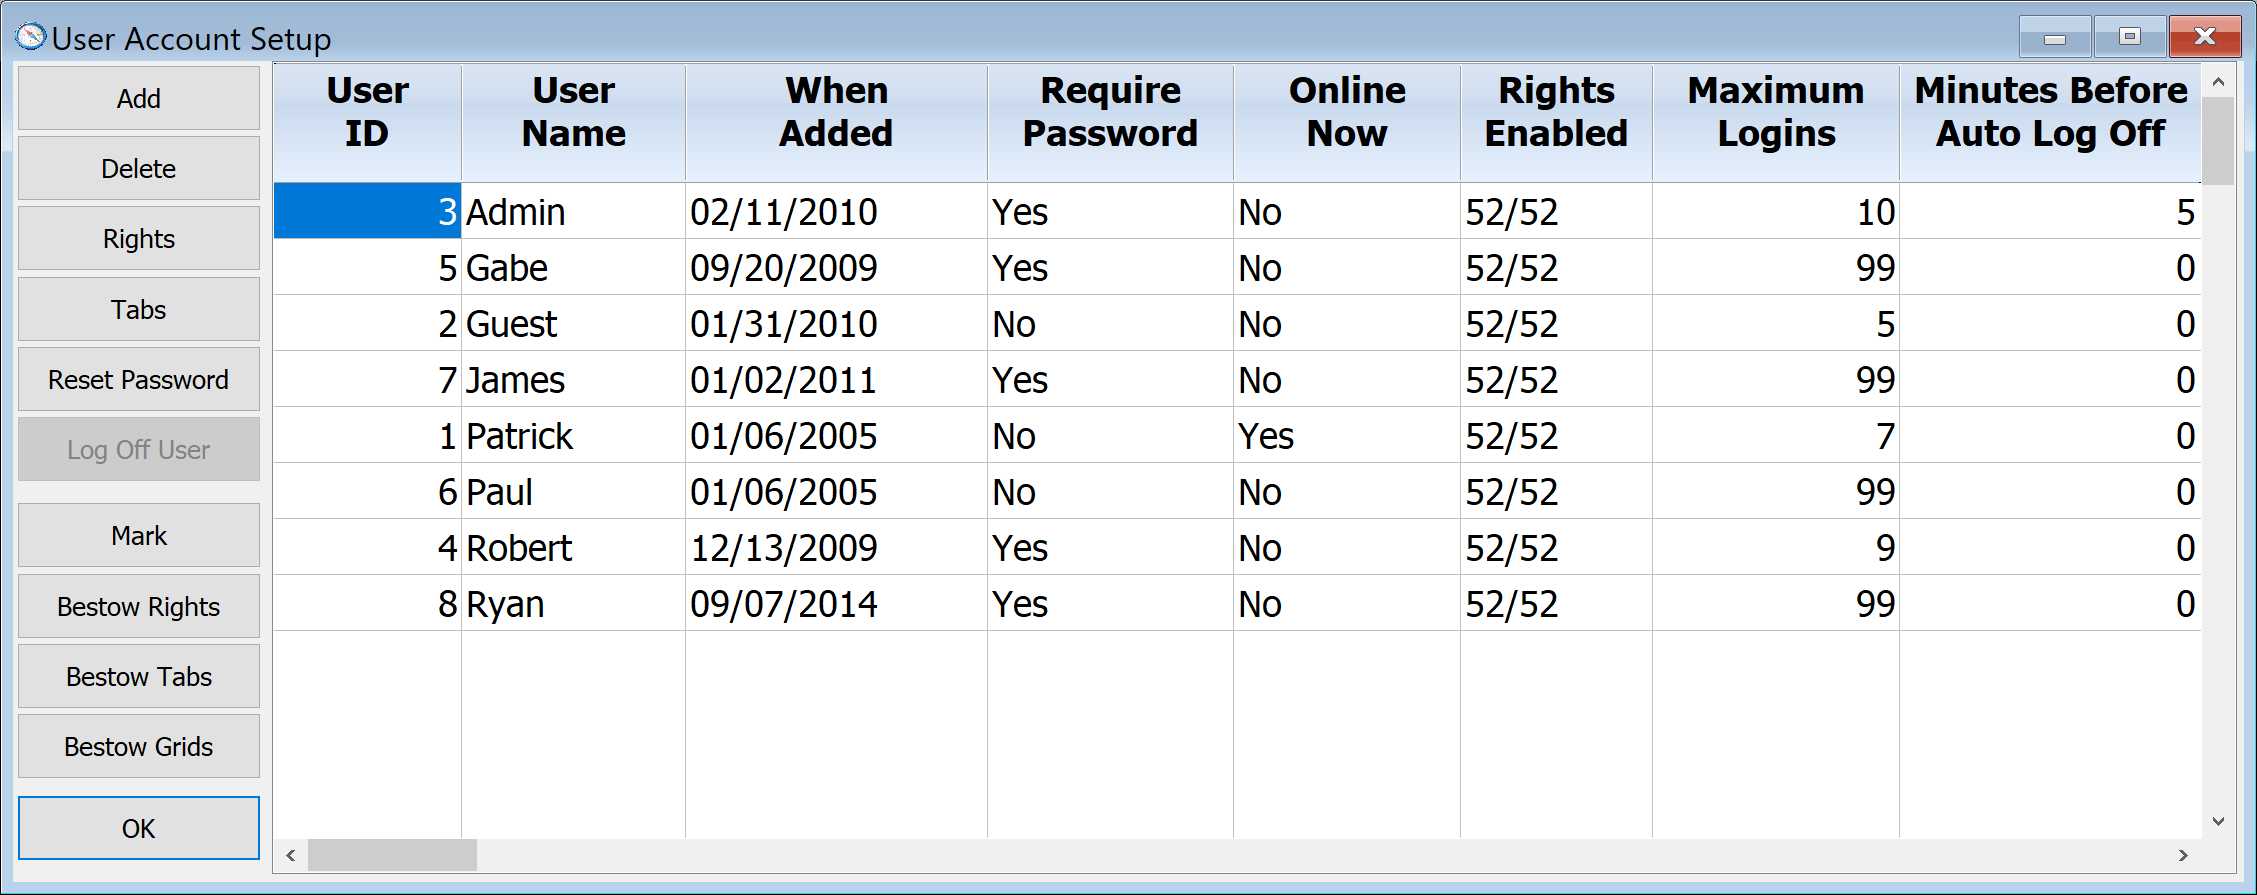
To create, delete, or modify a user account, click on User, Setup User Accounts. This will open the User Account Setup window, shown here:
Adding A New User Account
To add a new user, simply click the Add button, shown above. This will open the Adding A New User Account window shown here:
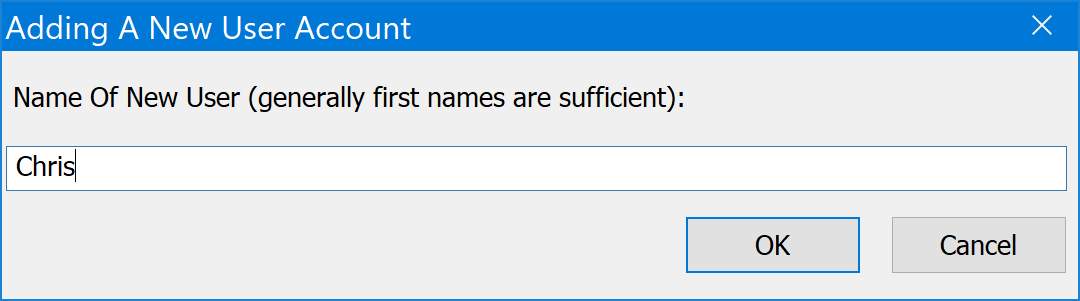
Type in the new user's user name. Typically a person's first name followed by the first letter of their last name is sufficient. This will immediately add the new user account with default settings. You should now configure the new user account based on what the user's needs are. In particular you should click the Rights button with the user's name highlighted, and turn off any of the advanced rights they do not need. Rights are in order of increasing importance, with the ability to create and delete user accounts being the most important right.
To delete an existing user account, first highlight the name of the existing account, then click the Delete button. You will be prompted for final confirmation before a user account is deleted. Note that deleting a user account will only remove a user's ability to login. All the things the user has ever done in DonorQuest will still have their name attached. For example, every donation they have ever added will still show their user name as the person who added the donation, and the Event Log will still have their name associated with everything they are responsible for doing.
Following is a description of the configurable attributes for each user account. To edit an attribute for a given user, double-click on it:
User Name
Name of user. This is the name the user will enter when logging into DonorQuest. It is also the name used to track the activities of each user.
When Added
This is the date the user account was created. This column is automatically set by DonorQuest and cannot be changed.
Require Password
Turn this setting on if the user is to be required to enter a password whenever they log in. The use of passwords is strongly encouraged, especially in very large organizations. If a user is not required to have a password, then entering their user name is all that's required for gaining access to the system during login.
Online Now
Shows whether the user is currently using DonorQuest. This is an informational column and can not be edited.
Rights Enabled
Shows how many of the 52 available rights are currently enabled for the user. If you are an administrator and would like to increase or decrease the rights enabled for a user, highlight their user name and click the Rights button on the left.
Maximum Logins
This setting controls the maximum number of concurrent logins each user may have (not the maximum lifetime logins). The default setting is 99, which effectively means no limit. For security reasons, each user should limit their logins to one workstation at a time, but it is up to the system administrator to decide whether to enforce that practice.
Minutes Before Auto Log Off
Normally all users should log out of DonorQuest at the end of the day. This allows certain automated services (such as data backups) to run at night when no one is in the database. Also, if a user is away from their workstation for a while they should log out of DonorQuest so no one else will be able to perform operations at their workstation under their name. However, users typically forget to log off when they should. The auto log off feature will automatically log a user out of DonorQuest after a specified number of minutes of inactivity. This feature is particularly useful when users are accessing the database from home on your organization's server. It is often the case that such a user will disconnect from the server hosting DonorQuest, but forget to log off DonorQuest first, in which case it keeps running on the server. For those using the online version of DonorQuest we provide, a mandatory automatic log out after two hours of inactivity will be enforced as an upper limit, though this feature may be used to shorten that limit.
Prompt For Pledge Linkage
During entry of a new donation, the donation may be linked as a payment towards one of the donor's outstanding pledges. When adding a new donation with the Prompt For Pledge Linkage option checked for a user's account, DonorQuest will automatically look for current outstanding pledges and prompt the user if any exist, asking if the donation may be a pledge payment. If the user responds Yes, DonorQuest will show a list of the donor's pledges and ask which one to apply the donation towards.
Remind Of Open Contacts
Turn on this setting if you want DonorQuest to remind the user when they have open (unresolved) contacts. With this setting on, the user will be shown a count of how many open contacts have come due for the current day, and how many open contacts there are from the past which they have not yet resolved. The reminder will be shown each time the user logs into DonorQuest. When a notification is shown at login, the user will also be given the option of immediately viewing the contacts which need to be acted on.
Tabs Enabled
These are the tabs on the Main Information edit window which a user is allowed access to. If no tab names are shown here, then the user has access to all tabs by default. To limit the user to specific tabs, click on the Tabs button shown on the left of the User Account Setup window.
Deleting An Existing User Account
To delete an existing user account, simply highlight the name of the user account you wish to delete and then click the Delete button, shown above in the User Account Setup window. Note that this will simply prevent the user from logging in, but everything they have done (all past entries) will still have their user name attached.
Resetting A User's Password
If a user forgets their password, you may highlight their user name and click the Reset Password button in the User Account Setup window to have DonorQuest forget their current password. The user will be asked to establish a new password the next time they login. Note that you should only do this if a user plans to immediately login and establish a new password, as their account will not be password protected until they login and establish a new password. If the user will not be logging in right away, you could login as the user and issue a temporary password which the user will change after they finally do login by clicking on User, Change Your Password.