DonorQuest has a very extensive donor data import facility which allows for the importing of completely new donor accounts, as well as for the updating of existing donor accounts, including the import of new donation records or corrected addresses during NCOA or CASS Certification processing. All of the fields you may enter information in directly are available as a destination for imported data, including any user-defined fields you may have created. DonorQuest will accept data in either the CSV format, or in a tab-delimited text file. These are universal formats also used by Microsoft Excel and Access for data exchange. If you have data in an Excel spreadsheet that you would like to import into DonorQuest, you would first save the Excel spreadsheet in CSV or tab-delimited text format.
Let's get right into it with a sample import, using a tab-delimited text file. The file is named, "Example For DonorQuest Import.txt" and is included in your DonorQuest installation. You should find it directly in the \DQuest\ folder. There is also an Excel version of the file, if you would like to examine it first that way. It has the following columns:
LastName, FirstName, OrgName, Address, Address2, City, State, Zip, County
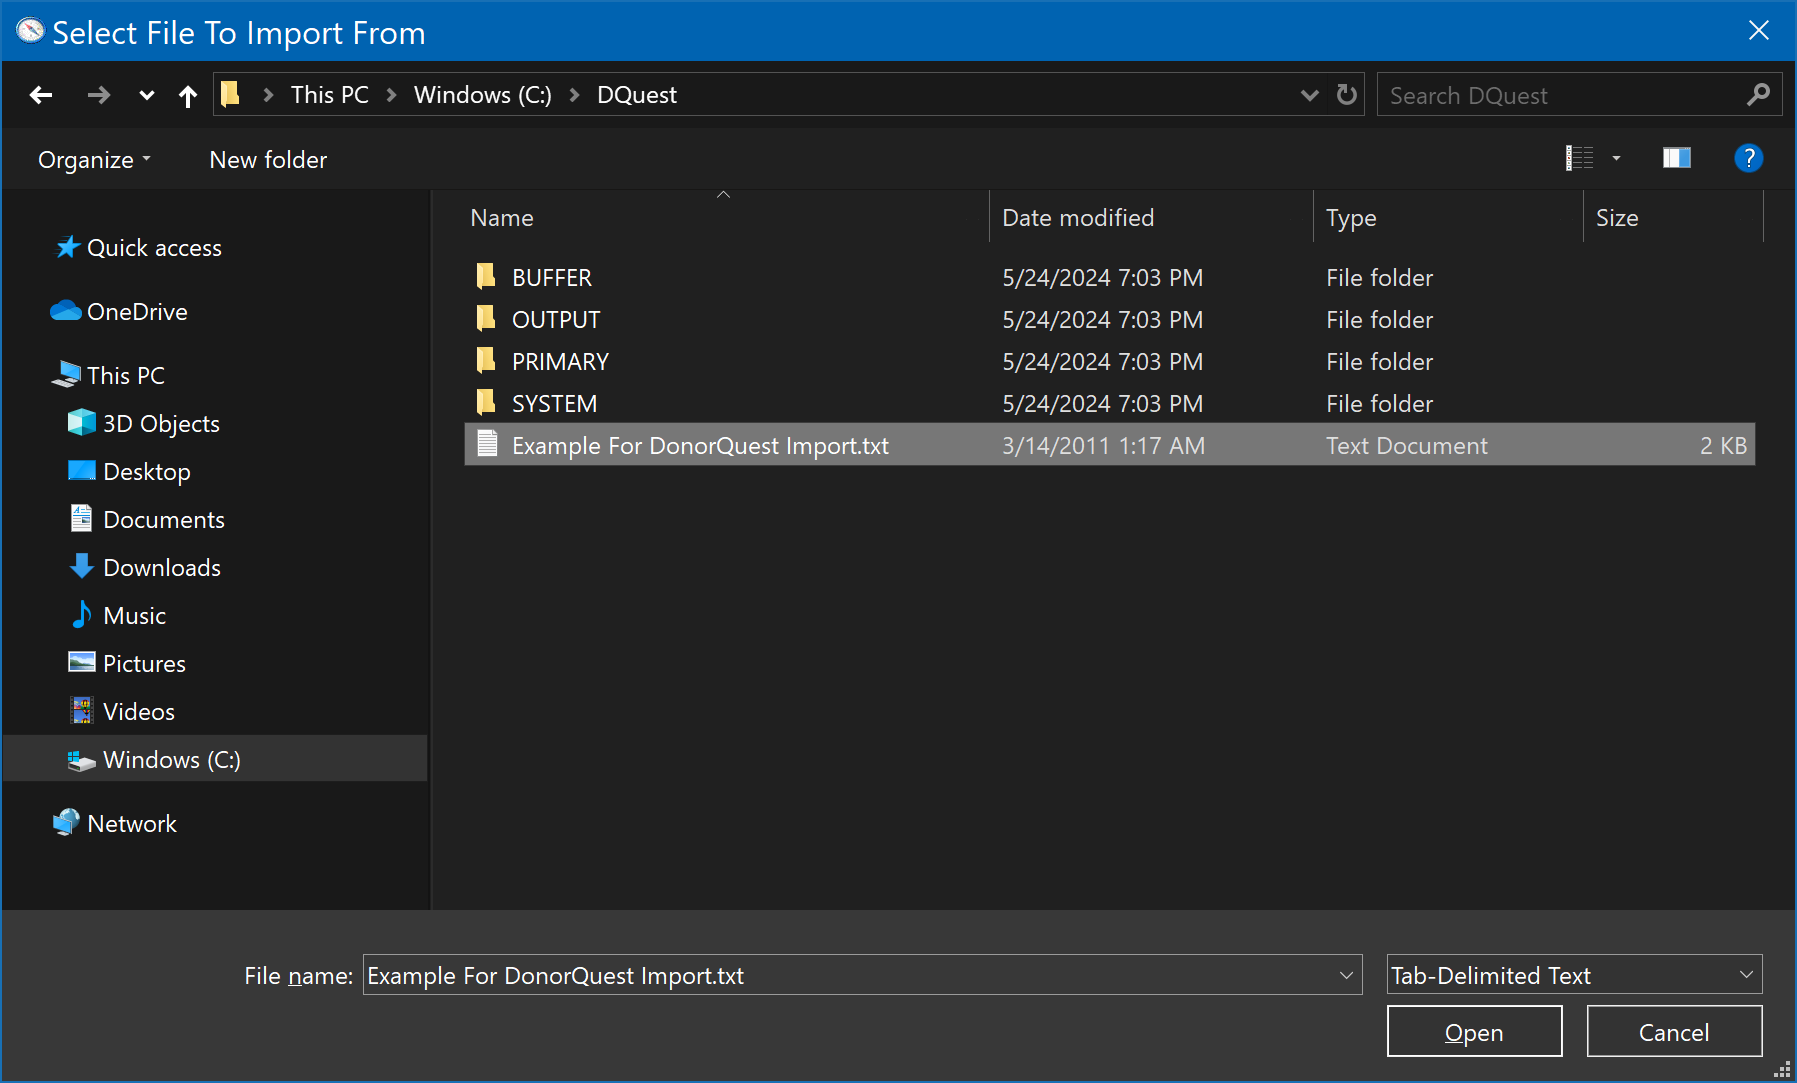
From within DonorQuest click on File, Import, Donor Data. A file dialog will open. It may already be open to your \DQuest\ folder, if not, navigate to it. It should look like this:
If you are using the cloud-based version of DonorQuest, you can download this sample file to your computer using this link: www.DonorQuest.com/downloads/ExampleForDonorQuestImport.csv
Be sure the file, "Example For DonorQuest Import.txt" is highlighted, then click the Open button. The DonorQuest Import Dialog should open like this:
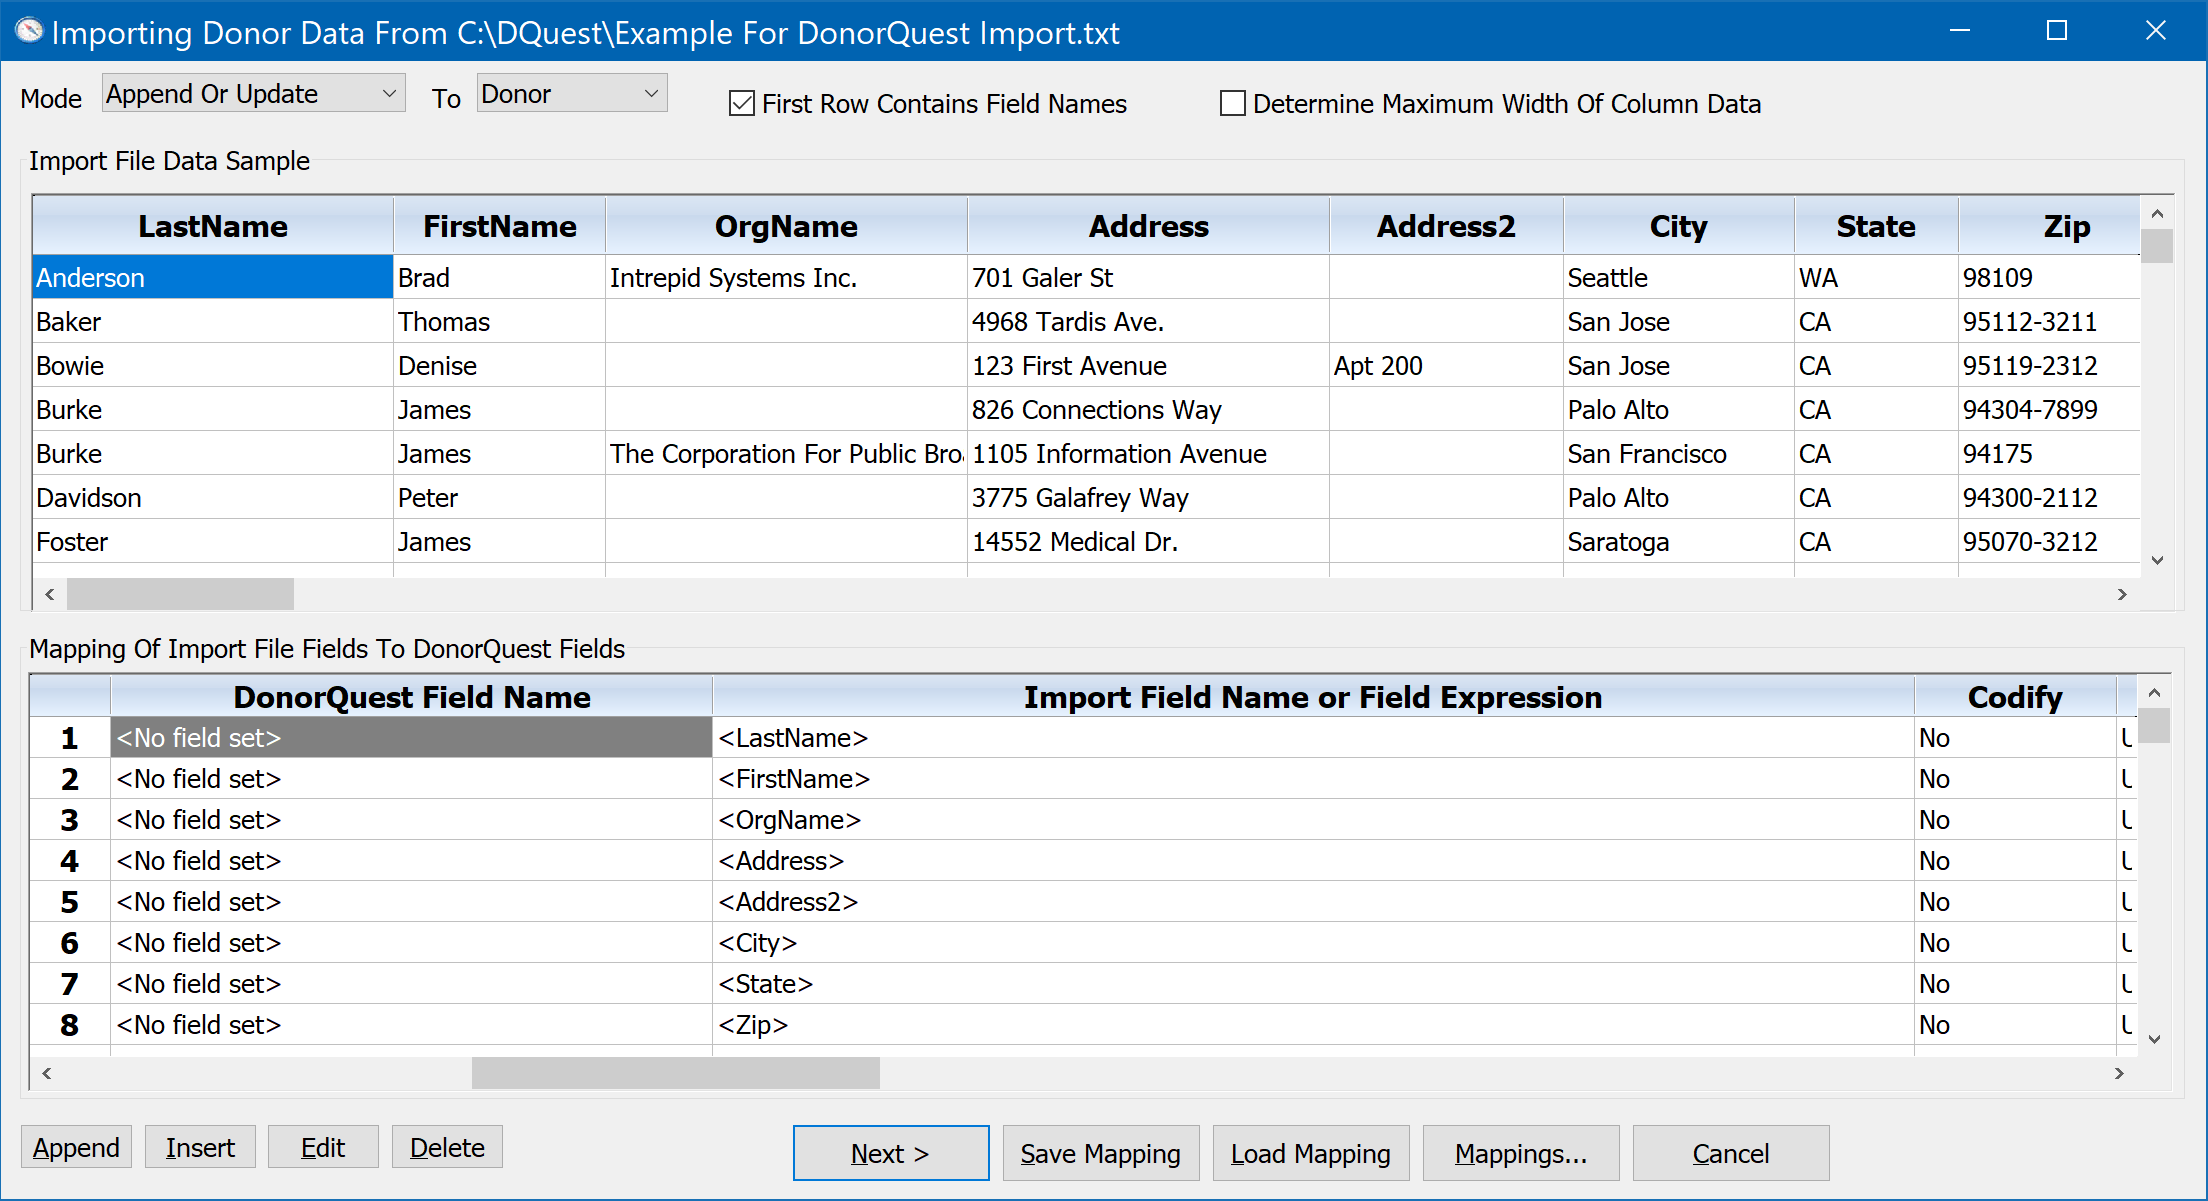
The DonorQuest import dialog consists of two window panes. The top pane, called the Import File Data Sample, shows a preview of the raw data in the import file you are working with. If the first row of the import file contains field names (which the sample file does), they will be shown as column headings in the sample. If the import file has only data and no field names, numeric field names will be created for the columns. The bottom pane is where you will tell DonorQuest what goes where -- it is the Mapping Of Import Fields To DonorQuest Fields. Quite simply, this is where you match up data columns from the import file with the most reasonable matches with the available data fields in DonorQuest.
The Mapping Of Import Fields To DonorQuest Fields consists of two columns. As the example above shows, the right-hand column, titled, "Import Field Name or Expression", is already pre-populated with the field names from the import file. The left column titled, "DonorQuest Field Name", is where we choose the DonorQuest field which corresponds to each import file field. This is how DonorQuest will know where to put the data from each field of the import file. Setting up this correspondence is called creating a field mapping, and it is really all there is to doing an import.
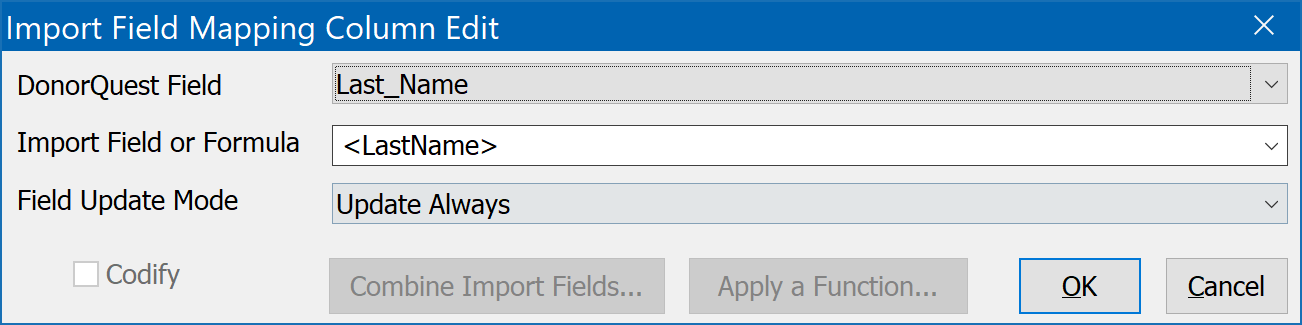
To create or mapping, we proceed one field at a time down the lower window pane, pairing up fields from the import file with the DonorQuest fields which best match. We do this by double-clicking each place it says, "<No field set>", and then deciding which DonorQuest field best fits. In the example above, here is how the first pairing should look:
If your import file contains any fields (columns) you do not want imported, simply delete them from the mapping using the Delete button, and they will not be included in the import.
Codify
The AppendThe Codify check box on the above dialog is an optional feature used only with coded DonorQuest fields. It should be checked on if you are importing non-coded data to a coded field in DonorQuest. DonorQuest uses codes for many fields to ensure accurate and consistent data entry of critical information. This is true of most fundraising software programs, so it is likely some of the data you are importing is already in a coded form if you are migrating from another fundraising program. For example, the Donation Stimulus or Campaign Code is a coded field in most systems. The State abbreviation for a mailing address also serves as an example of a code, for which the full spelling of the state is the description of the code. However, if you are importing from a system (or hand-created spreadsheet) which, for example, has long descriptions of campaigns only as opposed to both concise codes and code descriptions (as DonorQuest uses), you would use the codify option. DonorQuest would then create a unique code for each imported campaign description and assign the description to the new code on the corresponding drop-down list on the data entry forms.
Field Update Mode
The Field Update Mode tells DonorQuest what to do when it is updating existing constituent records. Update Always is the default mode, and it will unconditionally replace whatever may be in an existing field with what is coming in from the import file. The, "Update Only If Target Is Empty" option will only update the corresponding field of an existing record if that field doesn't already have something in it. Lastly, the, "Update Only If Source Has Data" mode will replace whatever may be in an existing field, but only if the import file actually has replacement data for the field. Note that only constituent information stored in the Header table can be updated, since there is only one header record per constituent, and that's where these options come in. Donation, Pledges, etc. are always only added anew during the import process, so no existing Donation, Pledge, etc. information is ever overwritten by an import.
When you have paired up all the import fields with the corresponding DonorQuest fields, the Import window should look like this:
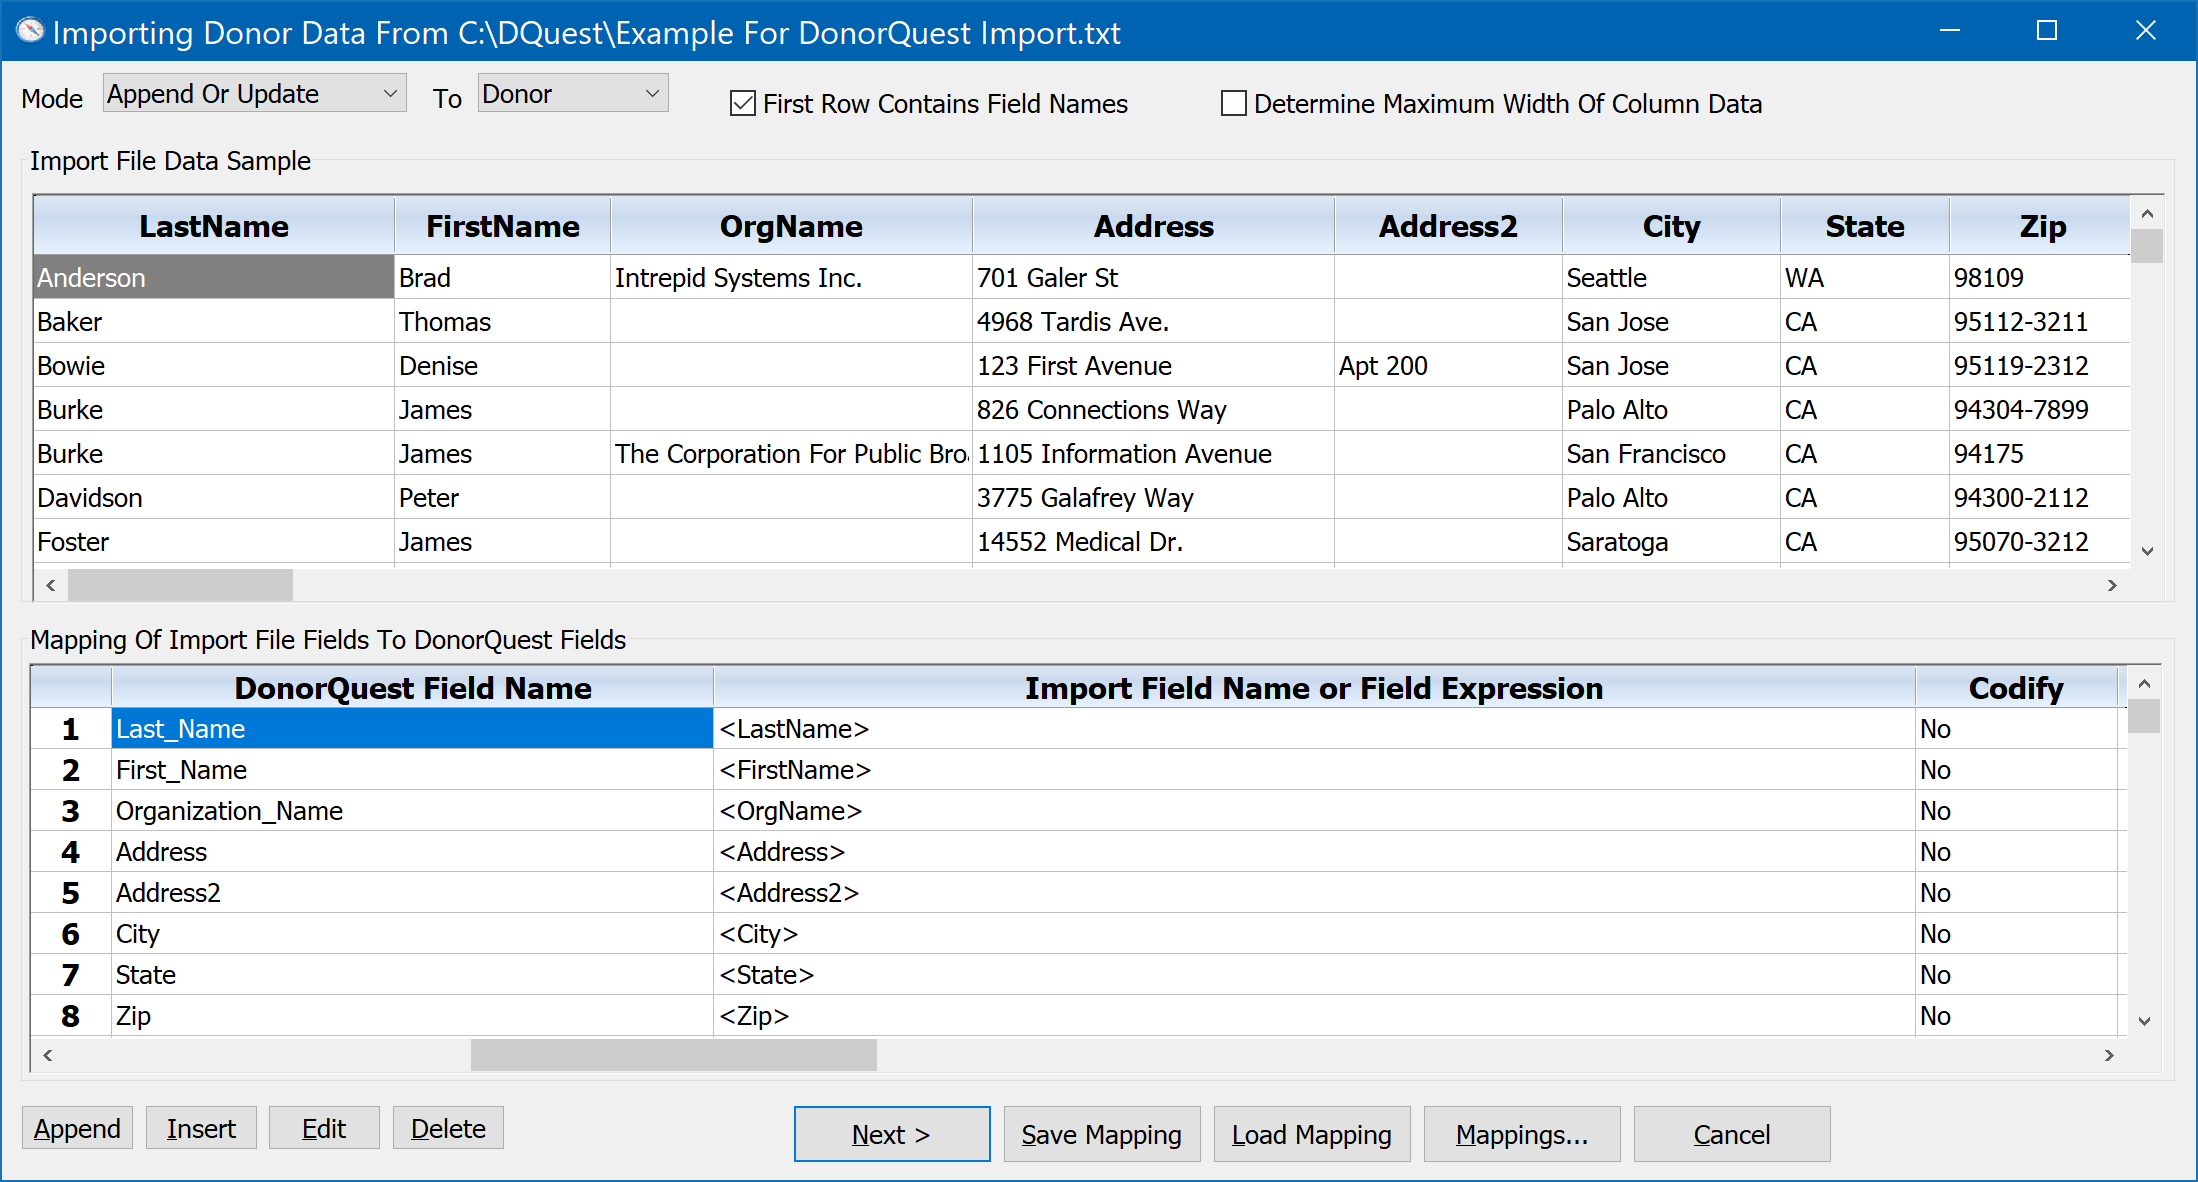
At this point you should click on the Save Mapping button. This will save the mapping work we have done so far so that if we were to close the import window and resume our work later, we could pick up where we left off. Once you save a mapping, it will be associated with the import file you are working on, so that if you begin an import again from the same file, DonorQuest will automatically apply the mapping as it was when you saved it. This is especially convenient if you get an import file on a regular basis with new data, but the same record layout. This is actually quite common if you are importing names, addresses, and donations on a regular basis from your organization's website, for example.
Once we have established the field mapping for the import file we are working on, we are ready to click the Next> button. This will open a final preview window, which will show exactly what is about to happen. It is the last chance we will have to confirm that all the fields have been mapped properly before the new information is actually committed to the DonorQuest database. Following the above example, this will open the Import Final Preview window, which looks like this:
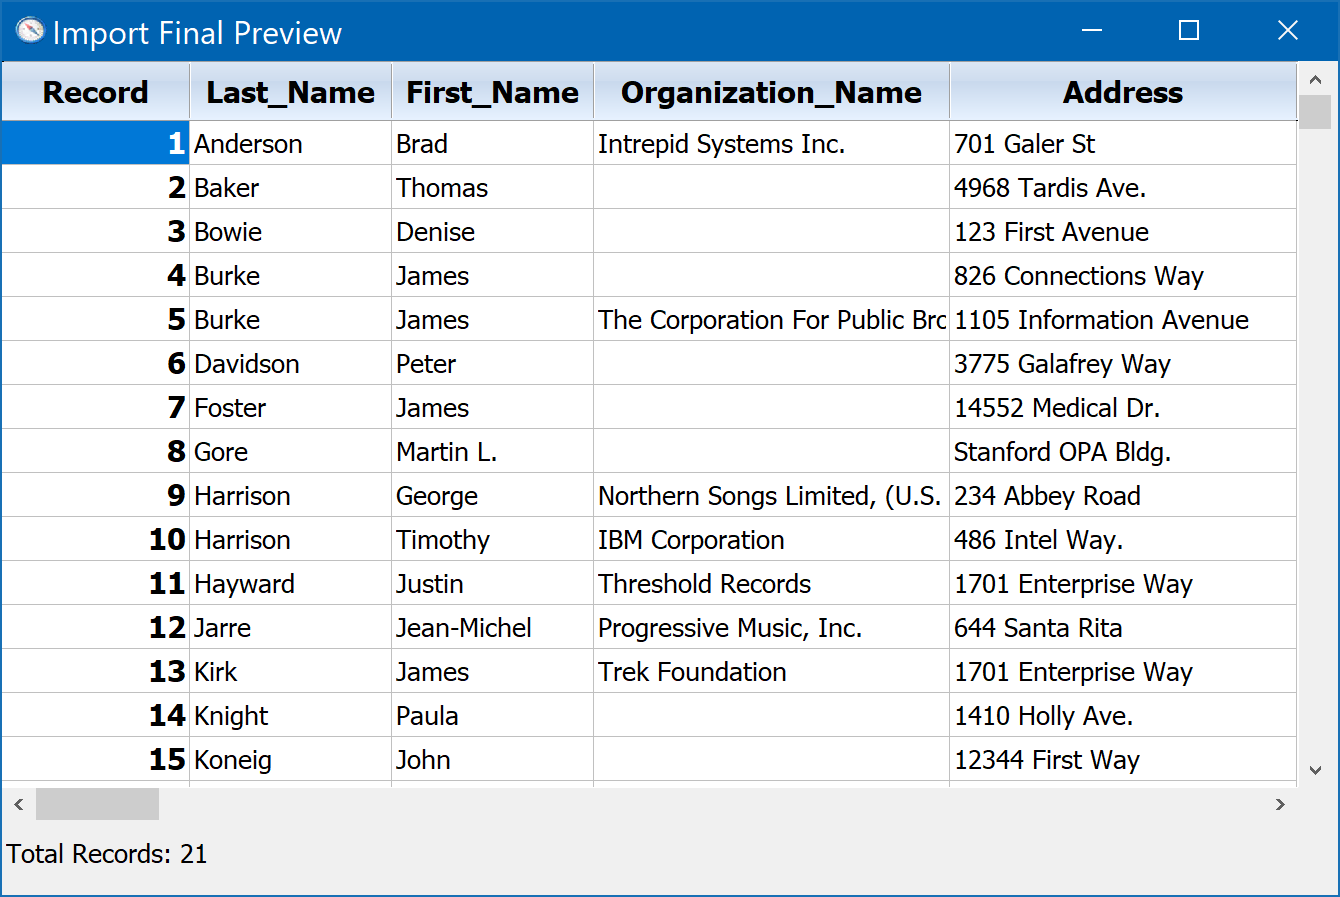
Clicking Finish would commit the data and complete the import. Clicking <Back would take us back to the import mapping window so that we can make corrections, or cancel the import all together. If you are running DonorQuest with your organization's live data, you should of course not complete this sample import. If you have installed the DonorQuest trial version and are just experimenting, feel free.
Note that DonorQuest is capable of importing donation information as well as basic name/address information. In fact, you may import data to any field in DonorQuest which you would normally have access to with manual entry, including any custom fields you may have created. The mapping process shown above is the same for donation information -- you would simply map the donation-specific columns of your import file to the corresponding donation fields in DonorQuest. DonorQuest will also support importing multiple donations for the same donor when the donations are in separate records of the import file, and even when they are in additional columns of the same import record.
We will now discuss some of the options of the Importing Donor Data window:
Mapping Mode
The Mapping Mode controls how the data you are importing interacts with the existing data in your DonorQuest database. There are four mapping modes:
Append Or Update
The Append Or Update mapping mode is the default setting. In this mode, before a new a constituent record is added to DonorQuest from the import file, DonorQuest will first check to see if the record already exists. If it does, then the existing record will be updated with any new information from the import file. If no matching record exists, a new one will be created. When a match is found, all biographical (Header table) fields referenced in the import mapping will be updated based on the Field Update Mode you choose for each field (explained above). However, existing donation records will never be updated, only new donations added. This is also true of the other tables which support multiple records per donor (Pledges, Extra Addresses, Memos, Contacts, etc.).
Append Only
Like the Append Or Update mapping mode, The Append Only mapping mode will also check to see if a matching constituent record already exists in DonorQuest before adding a new one. However, in this mode only new records will be added. Existing matching records will not be updated. If an existing matching record is found for a record from the import file, the import record will simply be skipped over. The skipping over of an import record means that any donations, Extra Addresses, Pledges, etc. it contains will also be skipped. This mode should be used when the import file should only contain completely new constituent records, and when you want to protect your existing constituent records from being changed in any way by the imported records.
Update Only
The Update Only mode is typically used to apply address corrections and to add new donations, pledges, etc. for existing donor records. It can be used, for example, to process a file of new donations for donors who are expected to already be in DonorQuest. It should be used when you want to insure that a record from the import file has a corresponding record already in DonorQuest for the import record to be processed. This mode is most appropriate for use in re-importing records that were exported from DonorQuest for external processing, such as Zip+4 or address correction services. This will prevent any constituent records you may have deleted (while your address correction file is being processed) from coming back.
Append Always
The Append Always mapping mode should be used when you know the file you are importing from only has new information, and you in fact want to protect existing records in DonorQuest from being updated in any way by the imported records.
How Existing Records Are Found
Except for the Append Always mode, all mapping modes employ the same conditions for determining if an import record already exists in DonorQuest. Making this determination depends on the fields available to DonorQuest in the import mapping. Some fields are more helpful to DonorQuest than others, so it gives priority to those key fields when looking for an existing matching record. The following possible field combinations are considered in order, each by itself being enough to determine whether an existing matching constituent record exists. If none of these field combinations are present in the import mapping, DonorQuest will not allow an import:
1.The unique donor (constituent) ID number, created and assigned by DonorQuest when a donor is first created.
2.A primary email address.
3.A secondary email address.
4.A first name, last name, city, state, and zip.
5.An organization name, city, state, and zip.
Number one above is a special case of importing back into DonorQuest records which were originally created in DonorQuest, then exported and modified outside of DonorQuest. An example would be Zip+4 processing of your mailing list, or any other external processing which may be done by a 3rd party such as address correction. That's why it's essential to always include the donor ID in any data you export from DonorQuest if you plan to reimport the records at a later date after they have been partially or completely modified -- the ID is all that is needed to uniquely identify the original record.
Note that when importing data originating in another database system, you normally would never map the ID of the other system to the ID field used by DonorQuest (ID_Num). These ID's would normally be wildly different between DonorQuest and the other system and at best would break the nice sequential allocation of donor ID's for new donors in DonorQuest. At worst, existing donor records in DonorQuest could be overwritten by completely unrelated donors from the other system, simply because they have the same ID. The one very rare exception to this rule would be if you are using DonorQuest as a secondary system to periodically receive data from another system, and you would always want the donor accounts and their assigned ID numbers to be identical between DonorQuest and the other system. In that case, the other system would always serve as the source for new donor records, and you would never originate new donors in DonorQuest.
The Import Destination
The "To" option on the main import window has a drop-down list with three options: Donor, Archive, and Buffer. These three options correspond to each of the three datasets in DonorQuest. The Donor dataset is where all of your active donor accounts are kept, so this will most often be the destination for your import. However you may also import directly to the Archive dataset where inactive donors are stored. The Buffer dataset is a good destination to use if you would like to just practice an import without affecting your live donor data. The Buffer dataset has various uses, but the information it contains must always be considered temporary, as it can be purged at anytime by clicking on System, Purge, Buffer Tables.
First Row Contains Data Fields
Normally the first row of your import file will contain field (column) names to describe the data in the file, such as Last Name, First Name, Address, etc. DonorQuest will usually detect this and check this box for you. However, some data files are created without field names. In that case, DonorQuest will create field names for you such as Field1, Field2, Field3, etc. These DonorQuest-generated field names may then be used in your import mapping. If DonorQuest is unable to determine whether the import file contains valid field names, it may guess incorrectly and you will have to check or uncheck this box accordingly.
Determining Maximum Width Of Column Data
Sometimes you will be dealing with an import file from a source you are unfamiliar with. Some of the data columns might in fact have no data at all. There is usually no reason to map empty columns from the import file to DonorQuest fields, unless you are performing an update of existing DonorQuest records from a trusted source and you want to allow totally blank columns to blank out the correspondingly mapped fields in DonorQuest. In most cases, you will simply not want to bother mapping empty columns. When you click on the checkbox, "Determine Maximum Width Of Column Data", DonorQuest will preprocess the entire import file, determining the largest value (in characters) each column contains. That character count will then be shown as part of the column title in the Import File Data Sample. You will then quickly be able to spot columns with no data, as they will have a zero next to the name.
Log Of Decisions Made During Import
As DonorQuest performs an import, it provides a status display of records processed, updated, appended, etc. DonorQuest also writes details of the decisions it makes during an import to a log file. This file is located in your \DQuest\ folder and is named ImpLog.txt. It is a standard text file, so you may open it using any standard text editor, such as the NotePad program included with Windows. DonorQuest allows easy viewing of this file by clicking on File, Open, The Import Log.